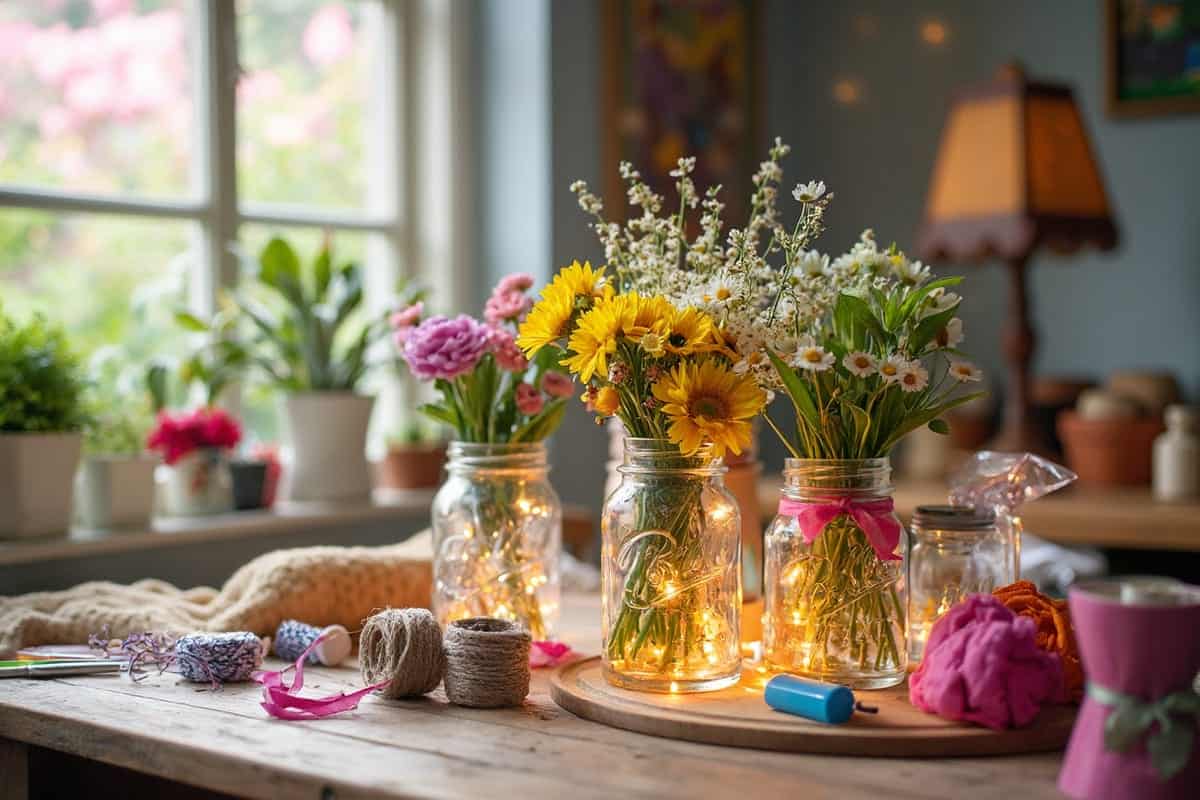
Whether it’s rainy days, cozy weekends, or just a fun way to make memories, mason jars are our go-to for crafting up some magic.
From glowing nightlights to whimsical fairy gardens, there’s something about these simple jars that turns everyday moments into little masterpieces.
So grab your mason jars, gather the kids (or maybe just keep them busy with their own project while you work!), and let’s dive into 24 adorable, easy, and totally Pinterest-worthy mason jar crafts that’ll brighten up your home in no time!
1. Magic Fairy Light Mason Jar Night Lights
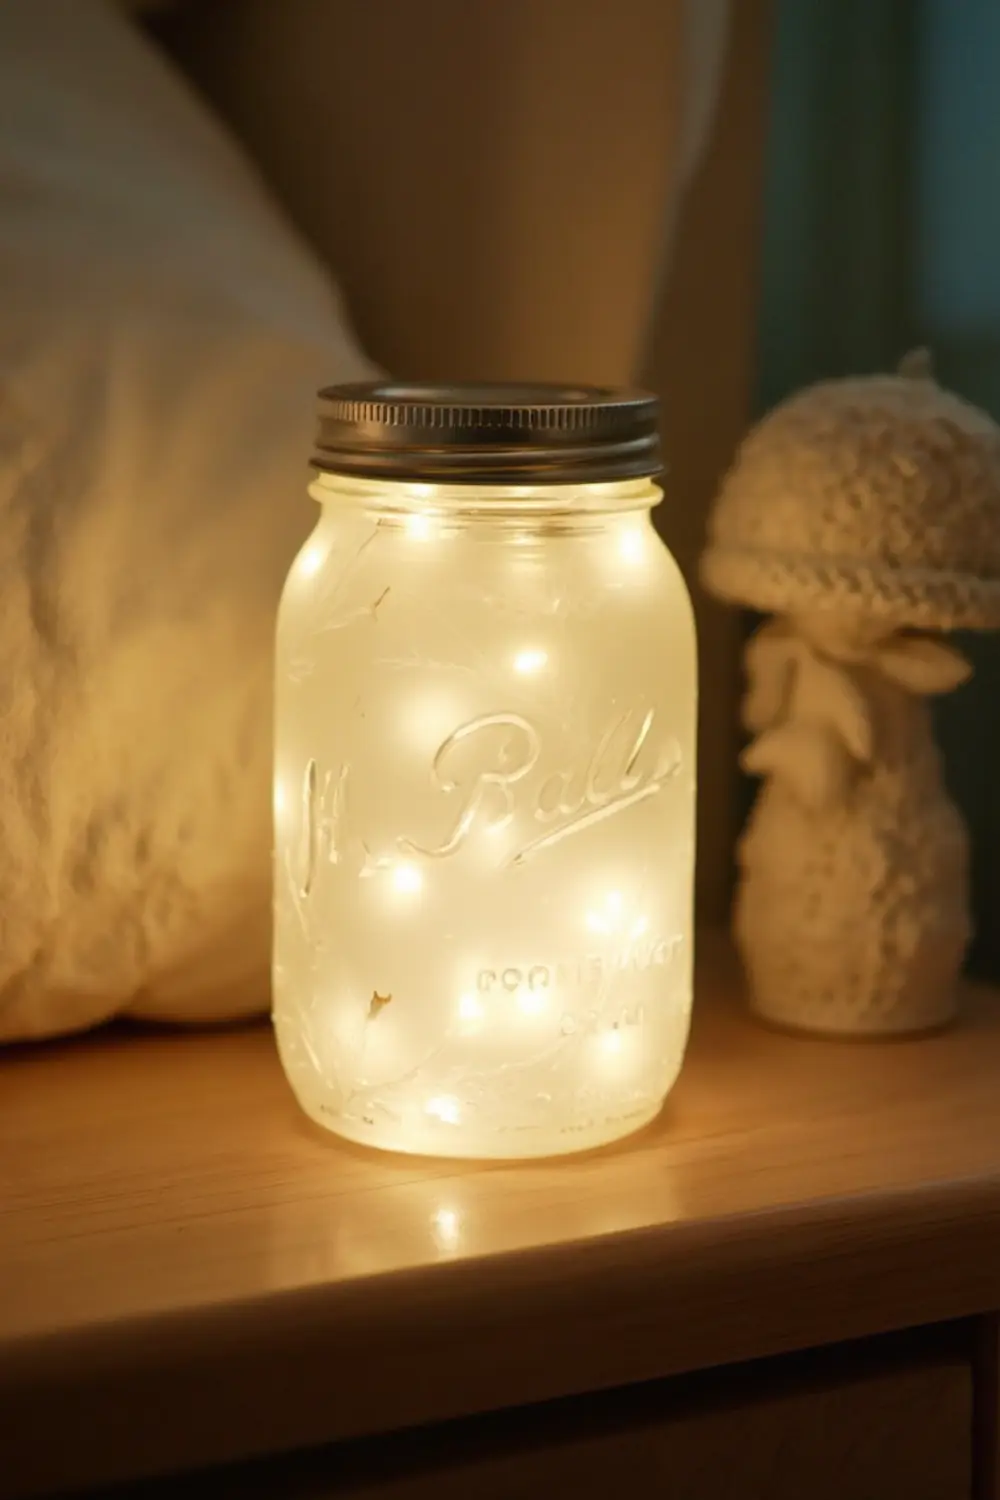
Okay y’all, this is literally the easiest craft ever and my girls are OBSESSED! We made these for their rooms last month and now all their friends want one too. Here’s what you need:
- Regular mason jar (any size works!)
- Fairy lights (battery operated)
- Frosted glass spray (you can get this at any craft store)
- Ribbon (optional but cute!)
First, make sure your jar is super clean and dry. Then take it outside (trust me on this – learned the hard way in my kitchen) and spray it evenly with the frosted glass spray. You might need 2-3 coats to get that perfect dreamy look. Let it dry completely between coats.
Once it’s dry, just pop in your fairy lights! I found these amazing battery-operated ones on Amazon that last forever. Thread the battery pack through the lid and voila! The perfect nightlight that isn’t too bright but gives just enough glow to keep the monsters away.
Pro tip: If you’re making this for younger kids, use plastic mason jars instead of glass. My youngest dropped hers like three times already and thankfully we thought ahead!
2. Rainbow Sand Art Mason Jars
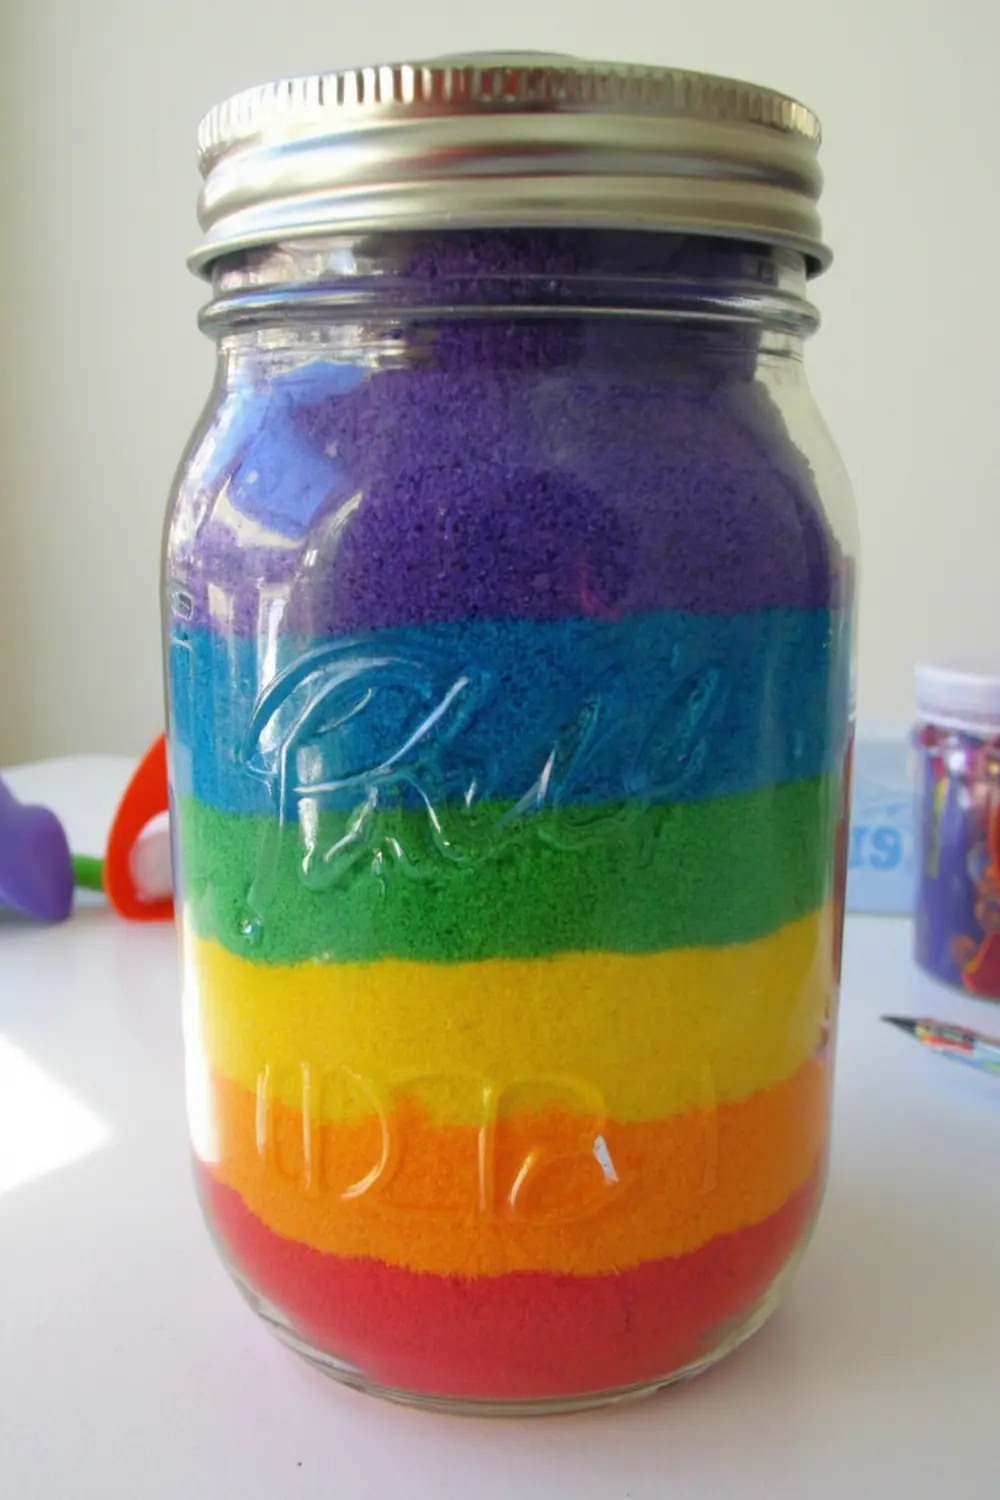
This craft is seriously giving me major 90s vibes (anyone else remember making these at county fairs?) but with a Pinterest-worthy upgrade! My oldest made these at her BFF’s birthday party and I was shook at how cute they turned out.
What you’ll need:
- Clean mason jar
- Colored craft sand (get the fine stuff!)
- Paper funnel or plastic spoon
- Popsicle stick
- Optional: glow-in-the-dark sand (this is next level, trust)
The trick to getting those perfect layers? Use a paper funnel (just roll up some paper) and pour the sand SUPER slowly against the side of the jar. Don’t dump it in the middle or you’ll mess up your layers! Start with your first color and add about half an inch. Then use a popsicle stick to gently smooth the top of the layer.
Keep adding colors until you reach the top. The hardest part is honestly keeping little hands patient enough to do one color at a time lol! We found that playing “sand art studio” and pretending to be artists helped keep them focused.
Store tip: Keep the lid on tight and don’t shake the jar… unless you want to turn this into a “mixing colors” science experiment (which, tbh, can be pretty fun too!)
3. Glitter Calm Down Jars
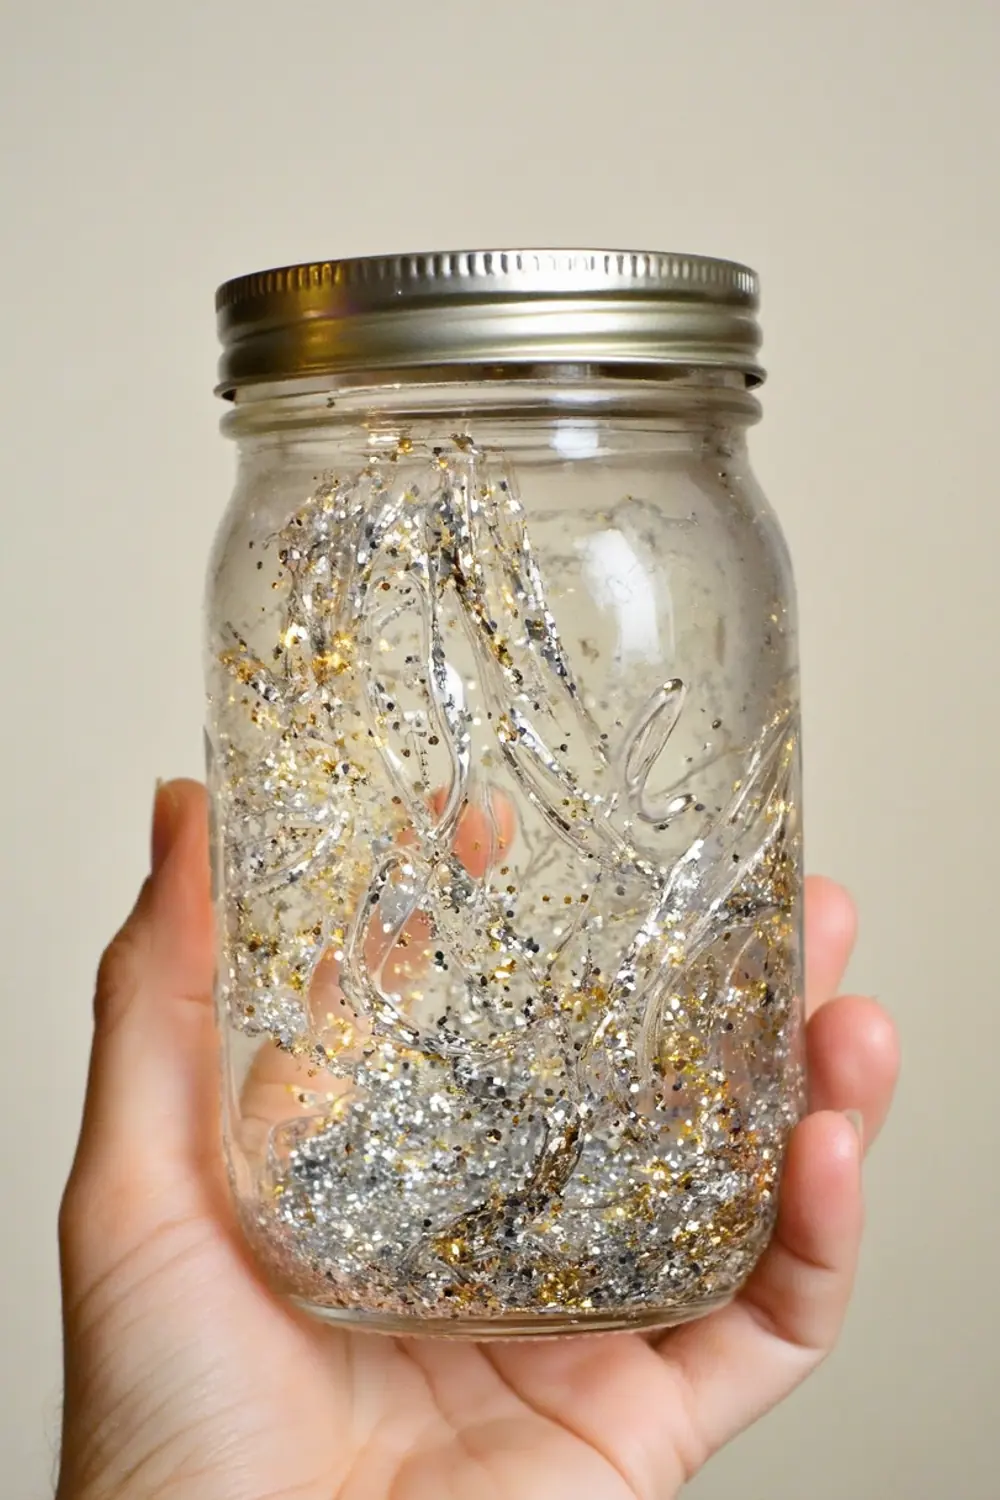
Tell me if this sounds familiar: Your kid is having a moment and you need something to help them reset? These calm down jars have literally saved my sanity more times than I can count!
You’ll need:
- Mason jar with a VERY tight lid
- Clear glue (the good stuff)
- Warm water
- Fine glitter
- Super glue for the lid
- Food coloring (optional)
Mix 1 part clear glue with 2 parts warm water in your jar. Add a generous sprinkle of glitter (we use about 2-3 tablespoons) and a drop or two of food coloring if you want. The trick is getting the right consistency… too watery and the glitter falls too fast, too thick and it barely moves.
IMPORTANT: You MUST super glue that lid on! Trust me on this… or you’ll end up with a glitter explosion that will haunt your house until you move.
When your kid needs a minute, have them shake the jar and watch the glitter slowly fall. It’s like magic – they can’t help but calm down while watching it!
4. Bug Catching Adventure Jars
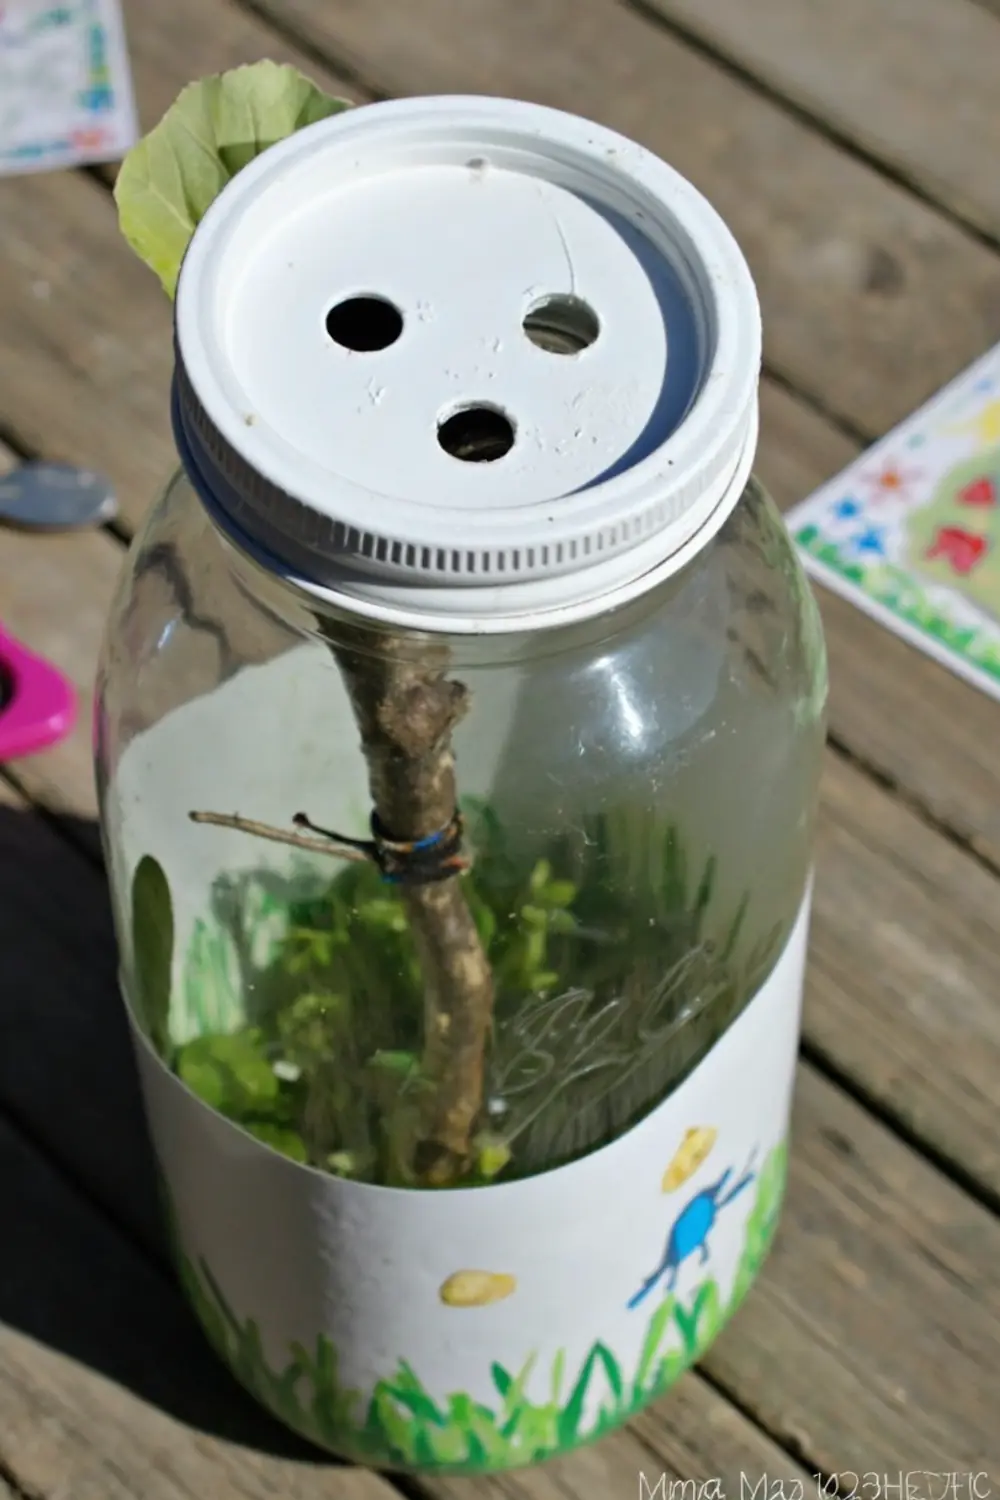
My little one is OBSESSED with collecting everything she finds outside (anyone else’s kid have a rock collection that’s taking over the house?). These bug-catching jars are perfect for temporary creature observations!
You’ll need:
- Wide-mouth mason jar
- Hammer and nail (parent job!)
- Acrylic paint
- Paint brushes
- Nature stickers
- Clear sealant spray
First things first – have a grown-up punch holes in the lid using a hammer and nail. We do about 10-15 small holes for air flow. Then let the kids go wild decorating! We paint grass at the bottom and flowers up the sides. Once the paint dries, seal it with clear spray so it doesn’t chip off.
Pro tip: Make a “bug care guide” with your kids before they start collecting. We have a rule: all bugs go back to their homes before bedtime!
5. Rainbow Pencil Holder Mason Jars
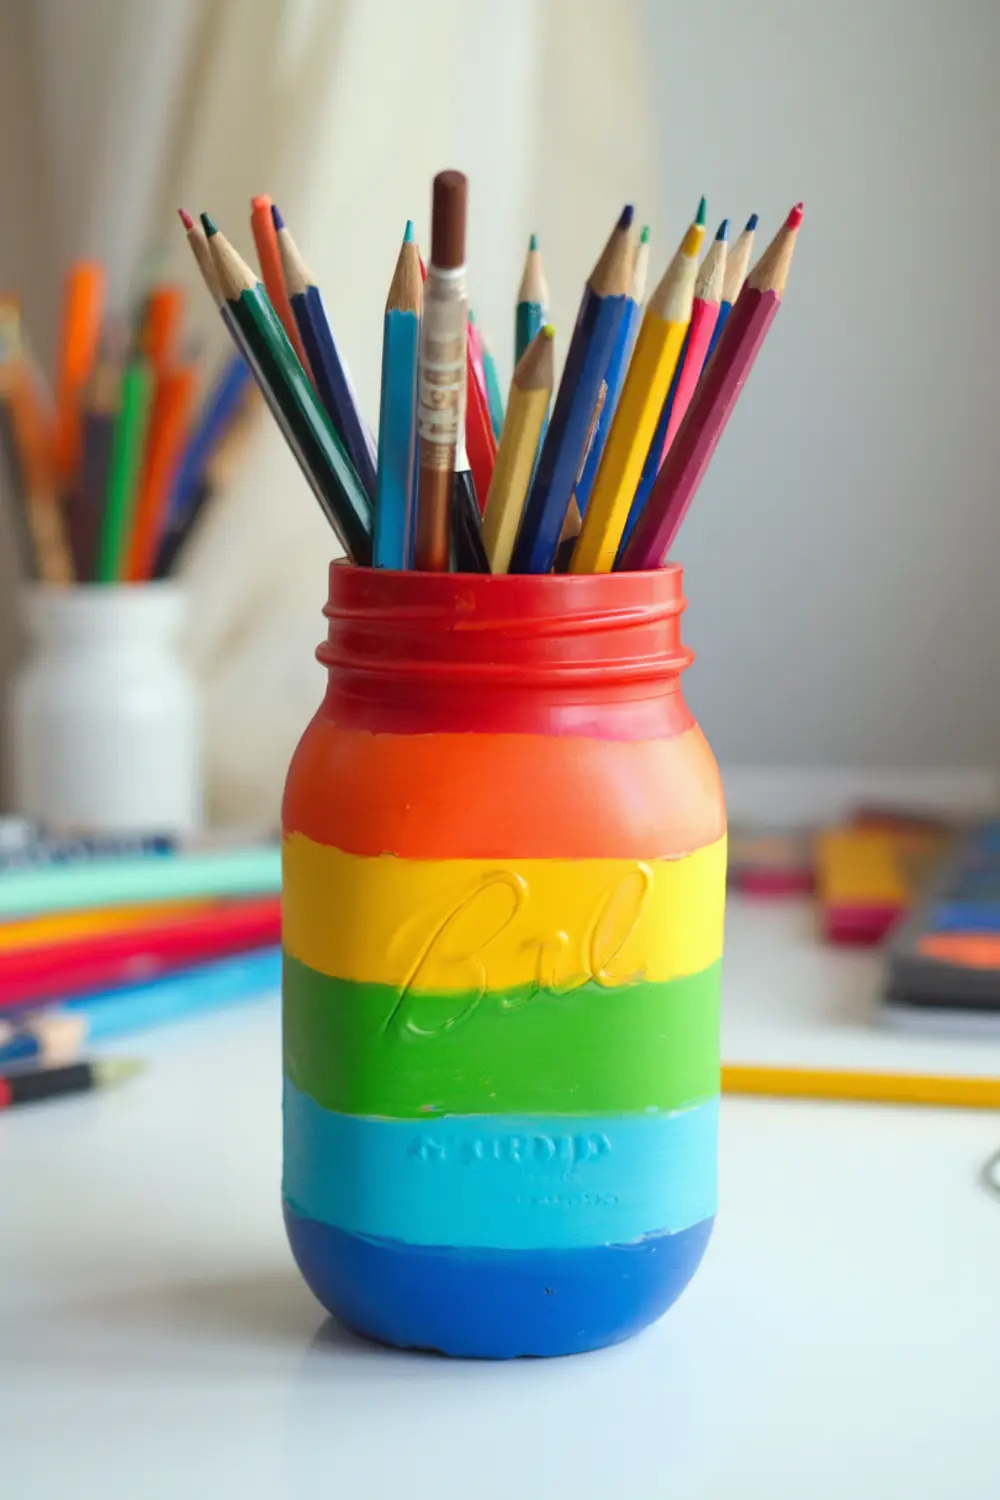
OMG y’all, these have seriously saved my sanity during homework time! No more hunting for lost pencils or markers rolling off the table.
You’ll need:
- Mason jar
- Acrylic paint in rainbow colors
- Painter’s tape
- Clear sealant
- Paint brushes
The secret to getting those clean lines? Painter’s tape is your BFF! We wrap it around the jar to make even sections, then paint one color at a time. Let each stripe dry completely before removing the tape and doing the next one.
My girls each picked their own color combo – my oldest went full rainbow while my youngest insisted on “unicorn colors” (lots of pink and purple lol). Perfect for back-to-school season or just organizing their craft supplies!
6. Winter Wonderland Snow Globes
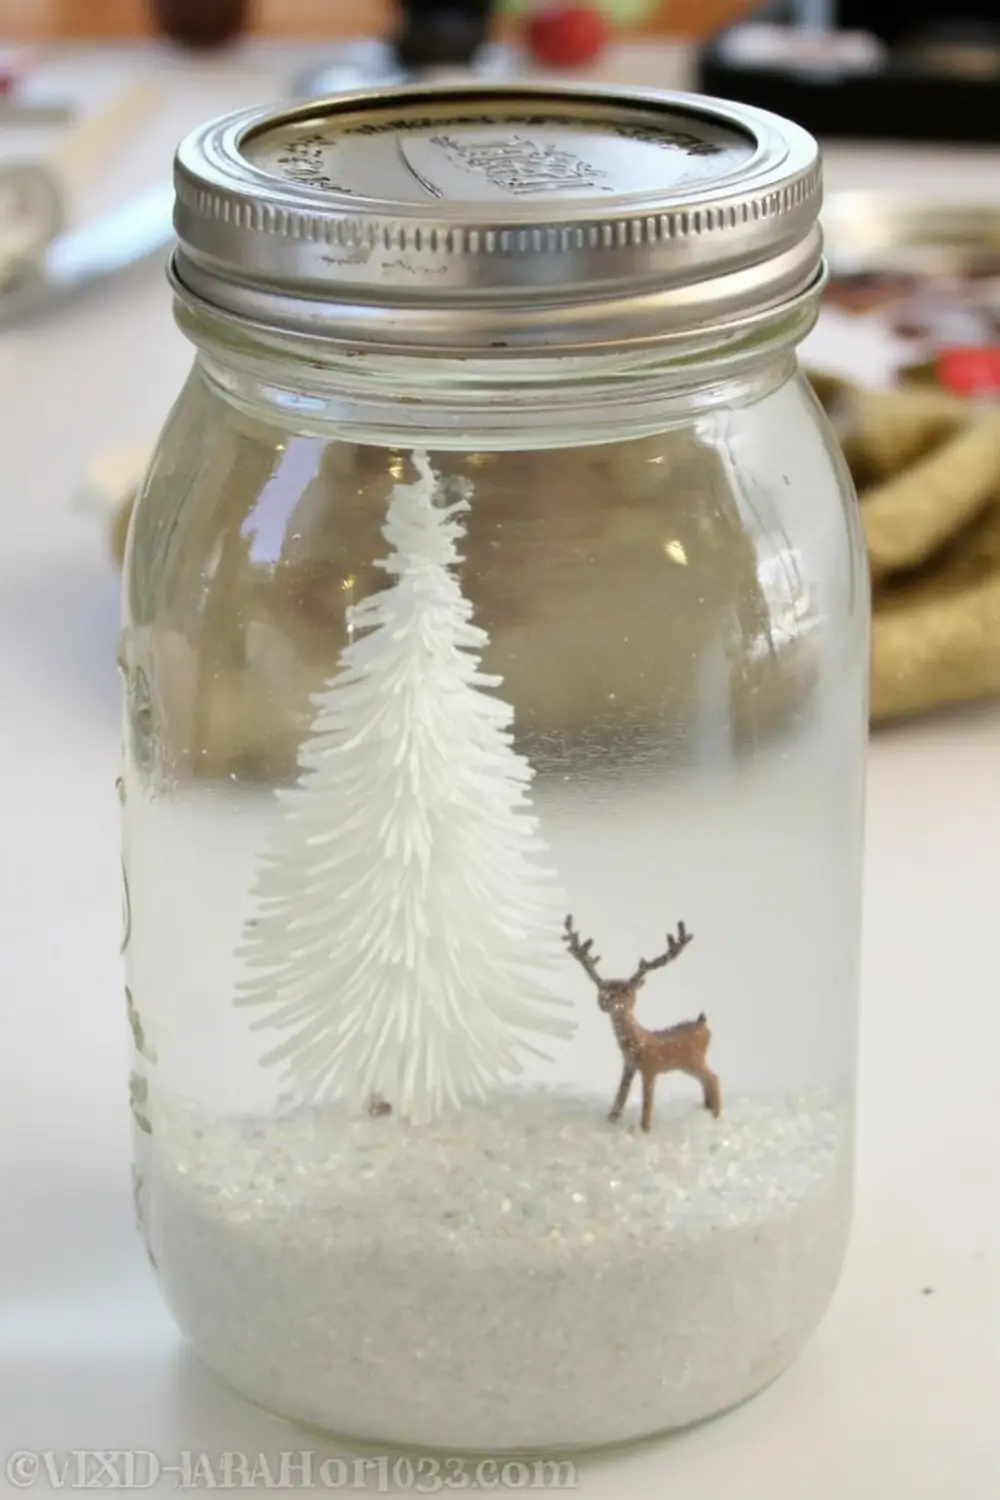
You guys, making these with my girls last Christmas was THE BEST! Even my husband got into it (though he’ll never admit how much fun he had).
You’ll need:
- Mason jar
- Glycerin (find it at any craft store)
- Distilled water
- White glitter or fake snow
- Small waterproof decorations
- Strong glue
- Clear silicone sealant
Here’s the secret to getting that perfect slow-falling snow effect: glycerin! Mix about 2-3 tablespoons with the distilled water. Then glue your decorations to the inside of the lid (we use E6000 glue – it’s waterproof!). Add your glitter, fill with the water mixture (leave a tiny bit of space), and seal it up with silicone around the rim.
Pro tip: Test your decorations in water first to make sure they’re really waterproof. We learned this the hard way when my youngest used a regular plastic unicorn that turned the water all sparkly pink!
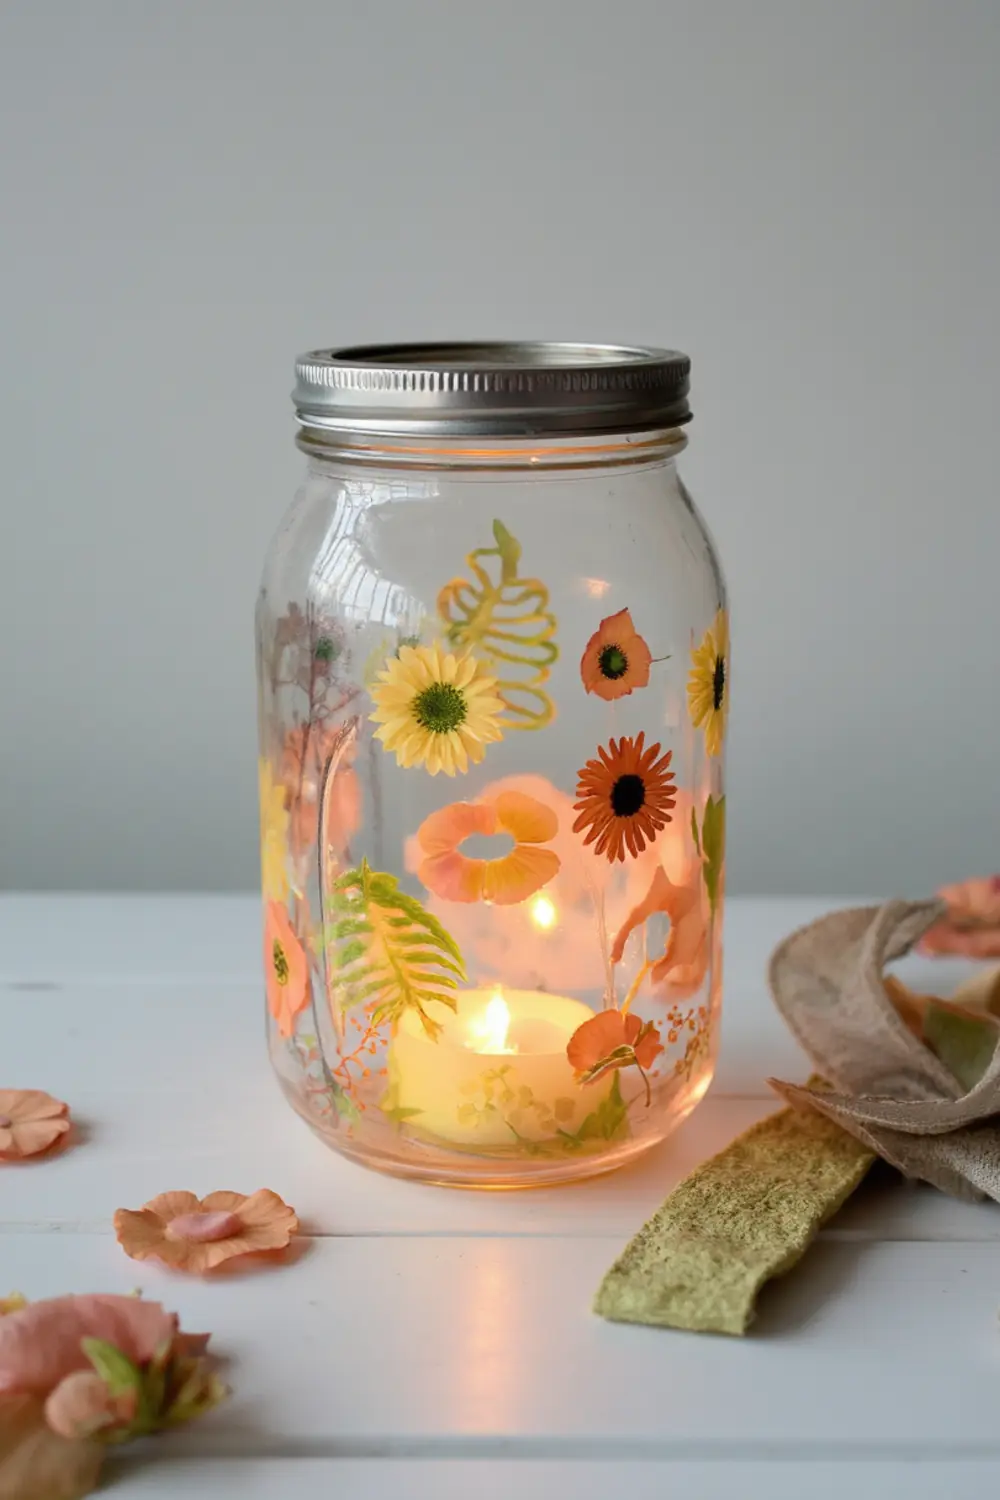
7. Butterfly Garden Luminaries
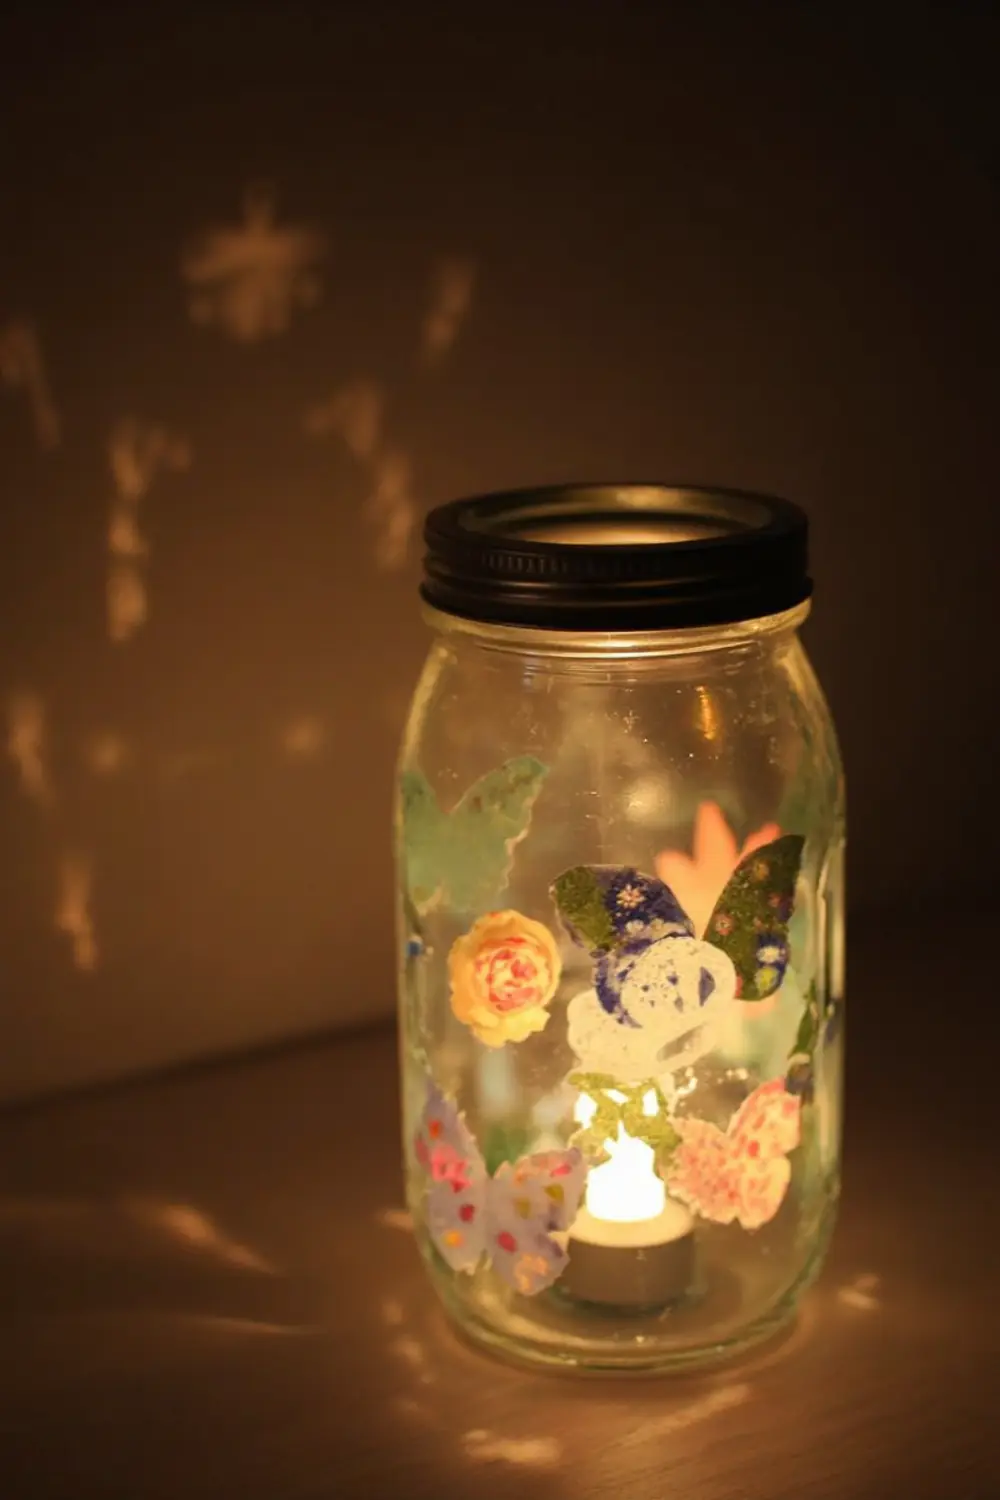
This craft literally makes me so happy every time I walk past it! We made these during that looong winter when we were desperately missing spring.
You’ll need:
- Mason jar
- Pressed flowers or flower stickers
- Paper butterfly cutouts
- Mod Podge
- Foam brush
- Battery-operated tealight
- Ribbon (optional)
Start by arranging your flowers and butterflies on the outside of the jar (do a practice run first!). Then use Mod Podge to carefully adhere each piece. The trick is to work in small sections and be super gentle with the pressed flowers – they’re so delicate!
Once everything’s dried, add a final coat of Mod Podge over everything to seal it. Pop in a battery tealight and… magic!
8. Constellation Night Light Jars

This craft literally came about because my oldest is going through a major space phase (thanks, NASA TikTok!).
You’ll need:
- Mason jar
- Navy blue spray paint
- Nail and hammer
- Star chart template
- Battery tea light
- Silver paint pen
- Clear sealer
Start by painting your jar navy blue (again, outside!). Once dry, print out your constellation template and tape it inside the jar. Use the nail to carefully punch holes where the stars should be. The tricky part is not punching too hard… my first attempt looked more like moon craters than stars!
Use the silver pen to connect the stars into constellations and maybe add some shooting stars or moons. Pop in the tea light and boom… instant planetarium!
9. Cookie Mix Gift Jars
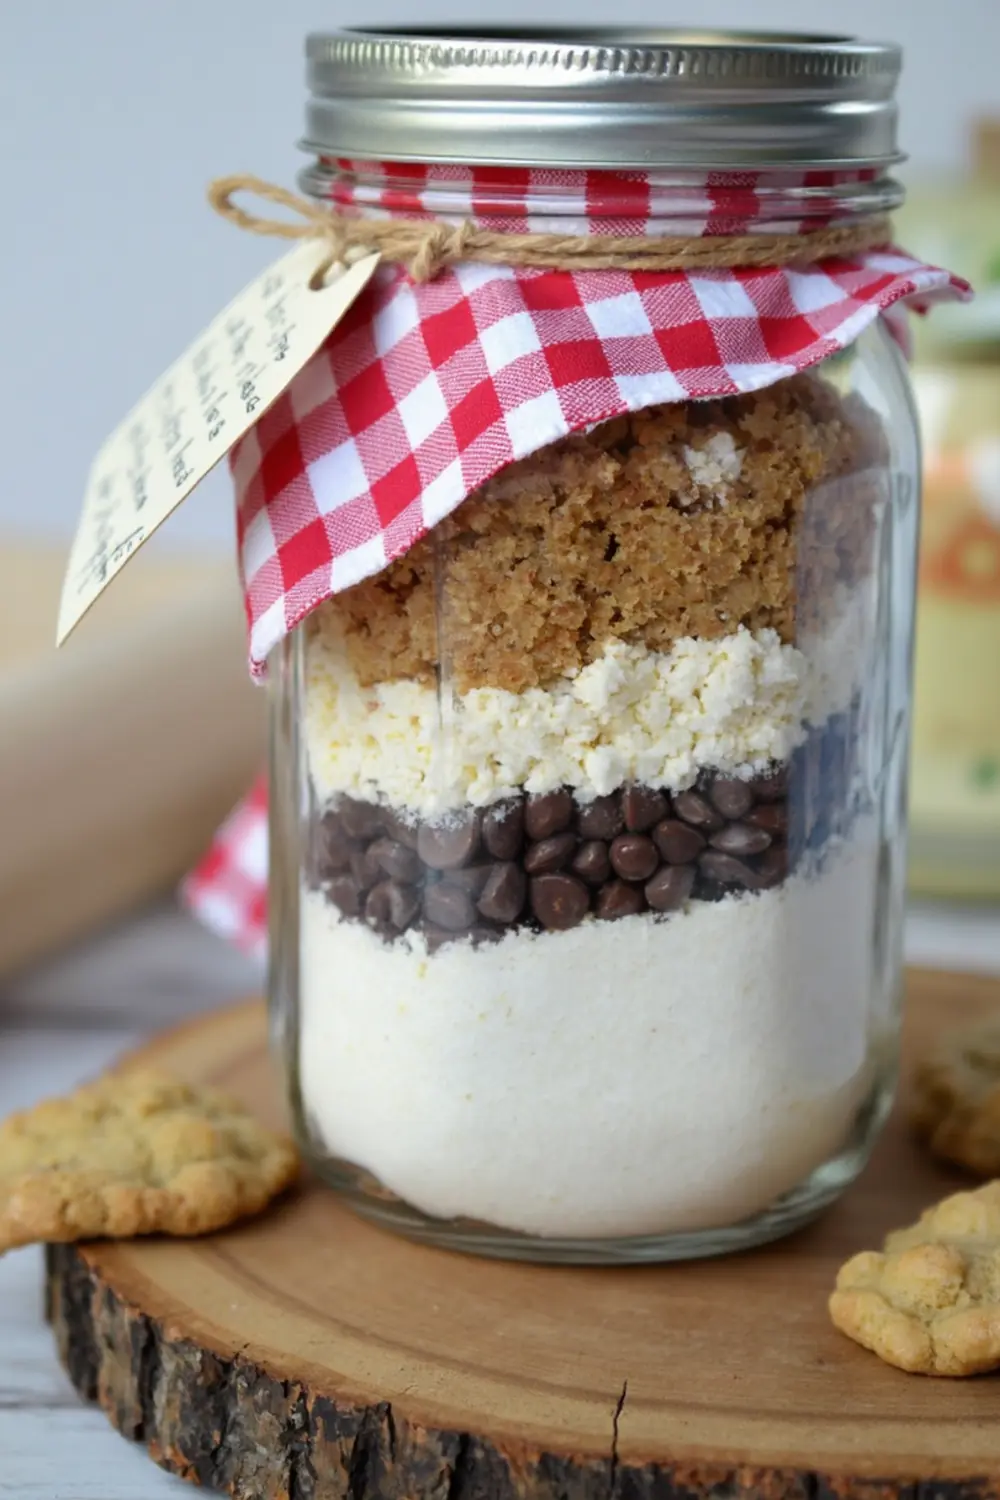
Perfect for teacher gifts or holidays! My girls love making these almost as much as they love eating the results!
You’ll need:
- Quart-size mason jar
- Your favorite cookie recipe ingredients
- Fabric circle for lid
- Twine or ribbon
- Recipe cards
- Measuring cups
Layer your dry ingredients in order (usually flour, sugar, brown sugar, chocolate chips, etc.). The key is to pack each layer down really well with the back of a spoon. Trust me, this makes such a difference in how pretty the layers look!
Pro tip: Put the smaller ingredients (like baking soda) in a little baggie and tuck it on top so it doesn’t get lost in the layers.
My girls love decorating the recipe cards… sometimes we get a bit carried away with the stickers but hey, that’s half the fun!
10. DIY Bath Salt Jars
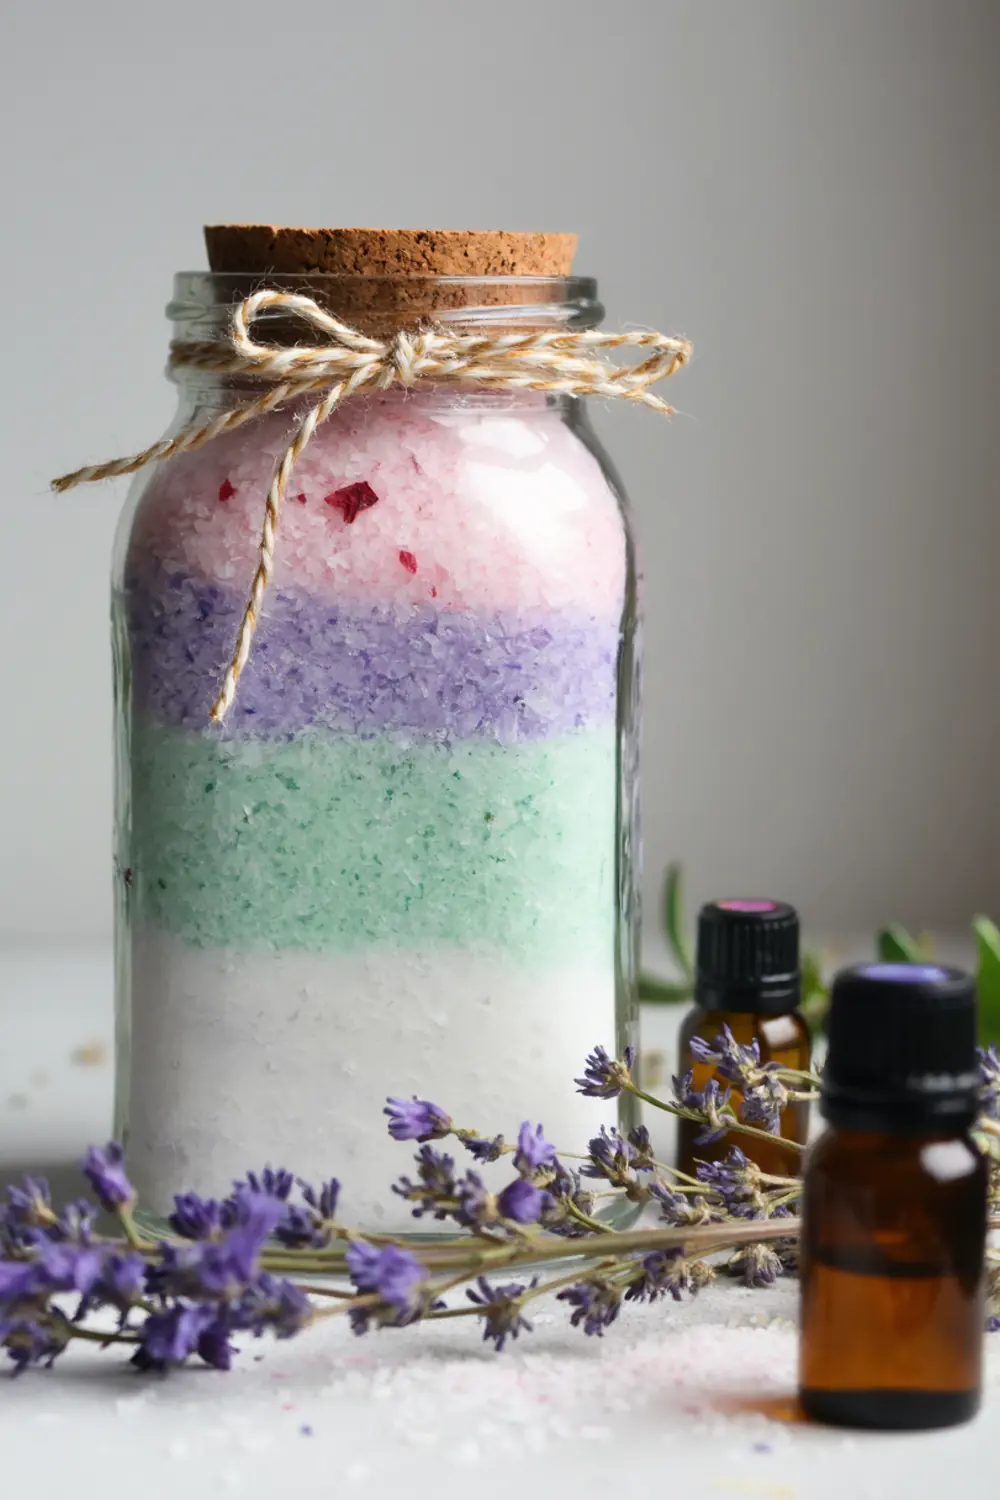
This is such a fun rainy day activity, and makes the BEST gifts! Plus your bathroom will smell amazing while you’re making them!
You’ll need:
- Epsom salts
- Food coloring or soap colorant
- Essential oils
- Dried flowers (optional)
- Small mason jars
- Pretty ribbon
Split your salts into bowls and add a tiny drop of color to each (less is more!). Add a few drops of essential oil – we love lavender for calm, citrus for energy. Layer them in the jar just like the sand art, but more gently. Add dried flower petals between layers if you’re feeling fancy!
Warning: This craft will make your kids want a “spa day” immediately after making it… which honestly isn’t the worst thing ever!
11. Stained Glass Mason Jar Lanterns
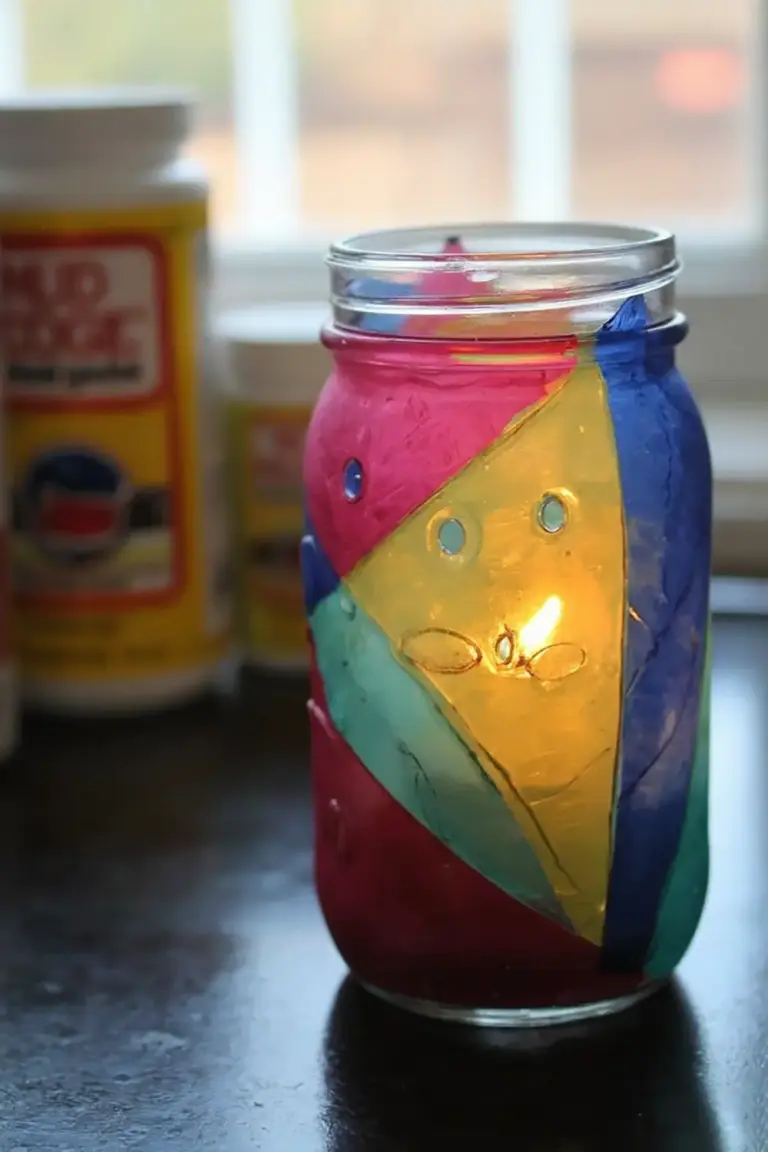
Confession time: I totally stole this idea from my daughter’s art teacher and now we’re obsessed! These make the prettiest centerpieces for outdoor dinners.
You’ll need:
- Mason jar
- Tissue paper in various colors
- Mod Podge
- Foam brush
- Scissors
- Battery-operated candle
- Clear sealant
Cut your tissue paper into small shapes (we do triangles and squares because… let’s be real, those are easiest). Brush a thin layer of Mod Podge on a small section of the jar, stick on your tissue paper pieces, then brush another layer over top. Keep going until the whole jar is covered!
Pro tip: Leave tiny gaps between the pieces to let more light through. The first one I made looked more like a solid blob because I overlapped too much!
12. Herb Garden Mason Jars
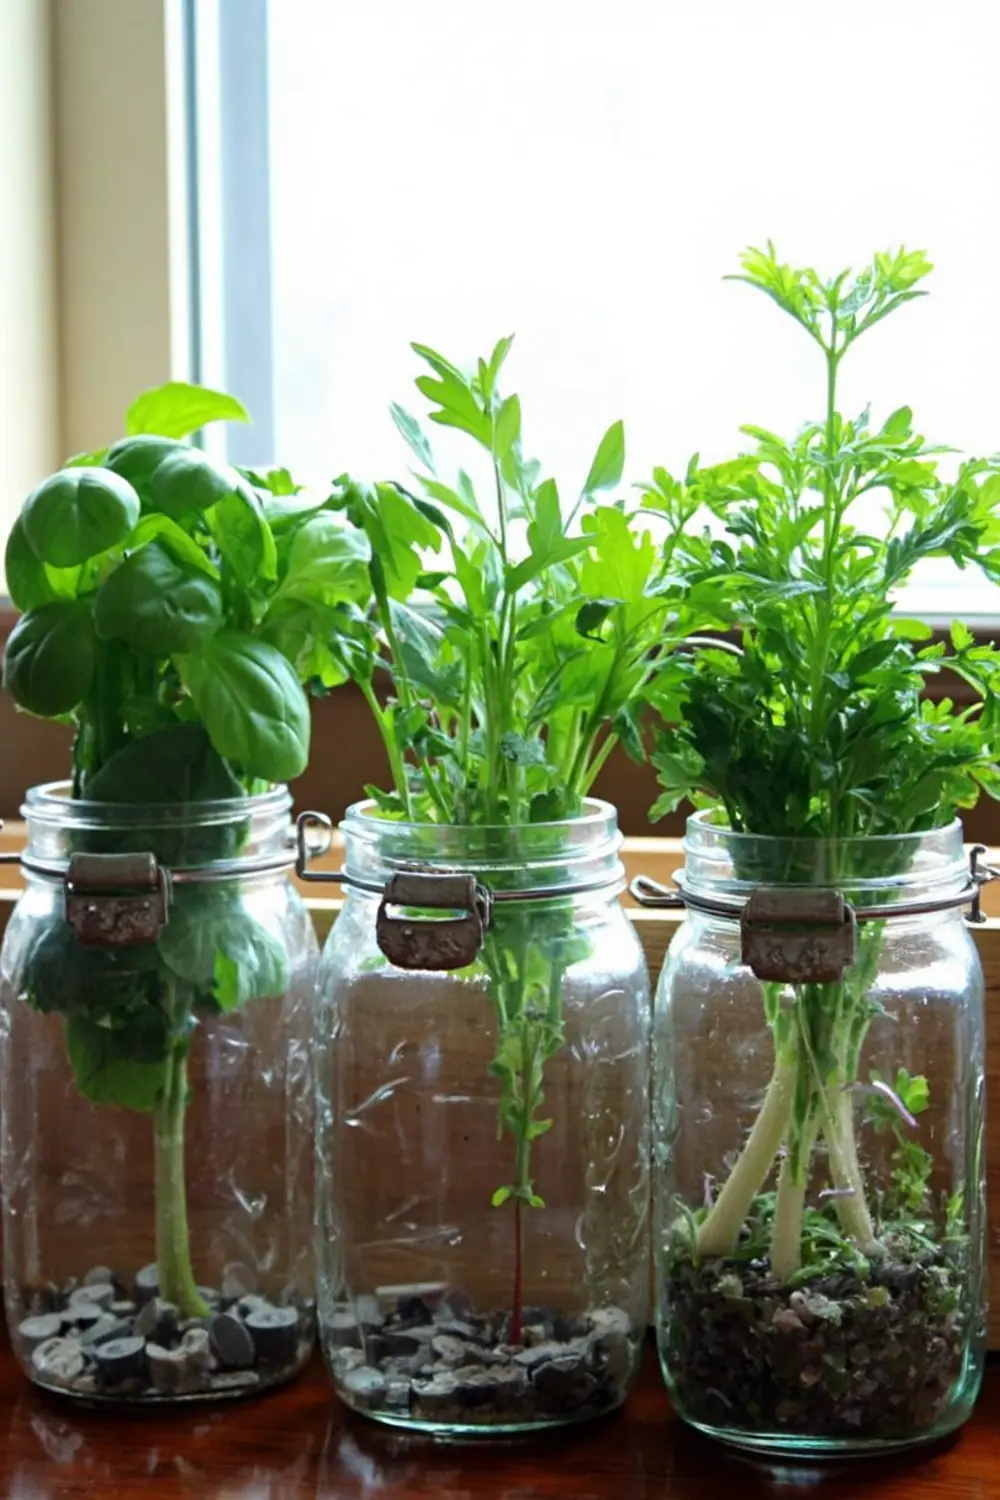
Y’all, I finally found a way to keep herbs alive longer than a week! (My husband is shocked too)
You’ll need:
- Wide-mouth mason jars
- Mounting board
- Metal pipe clamps
- Rocks for drainage
- Potting soil
- Herb plants
- Drill (parent job!)
First, drill drainage holes in the lid (or use mesh screens). Fill the bottom with rocks, then soil, then your herbs. The genius part is mounting them on the board near your kitchen window… no more forgotten herbs dying in the back of the fridge!
My girls love being our “herb waterers” – they even made little name tags for each plant. Though somehow the mint got labeled as “toothpaste plant” and honestly… that’s pretty accurate!
13. DIY Mason Jar Soap Dispensers
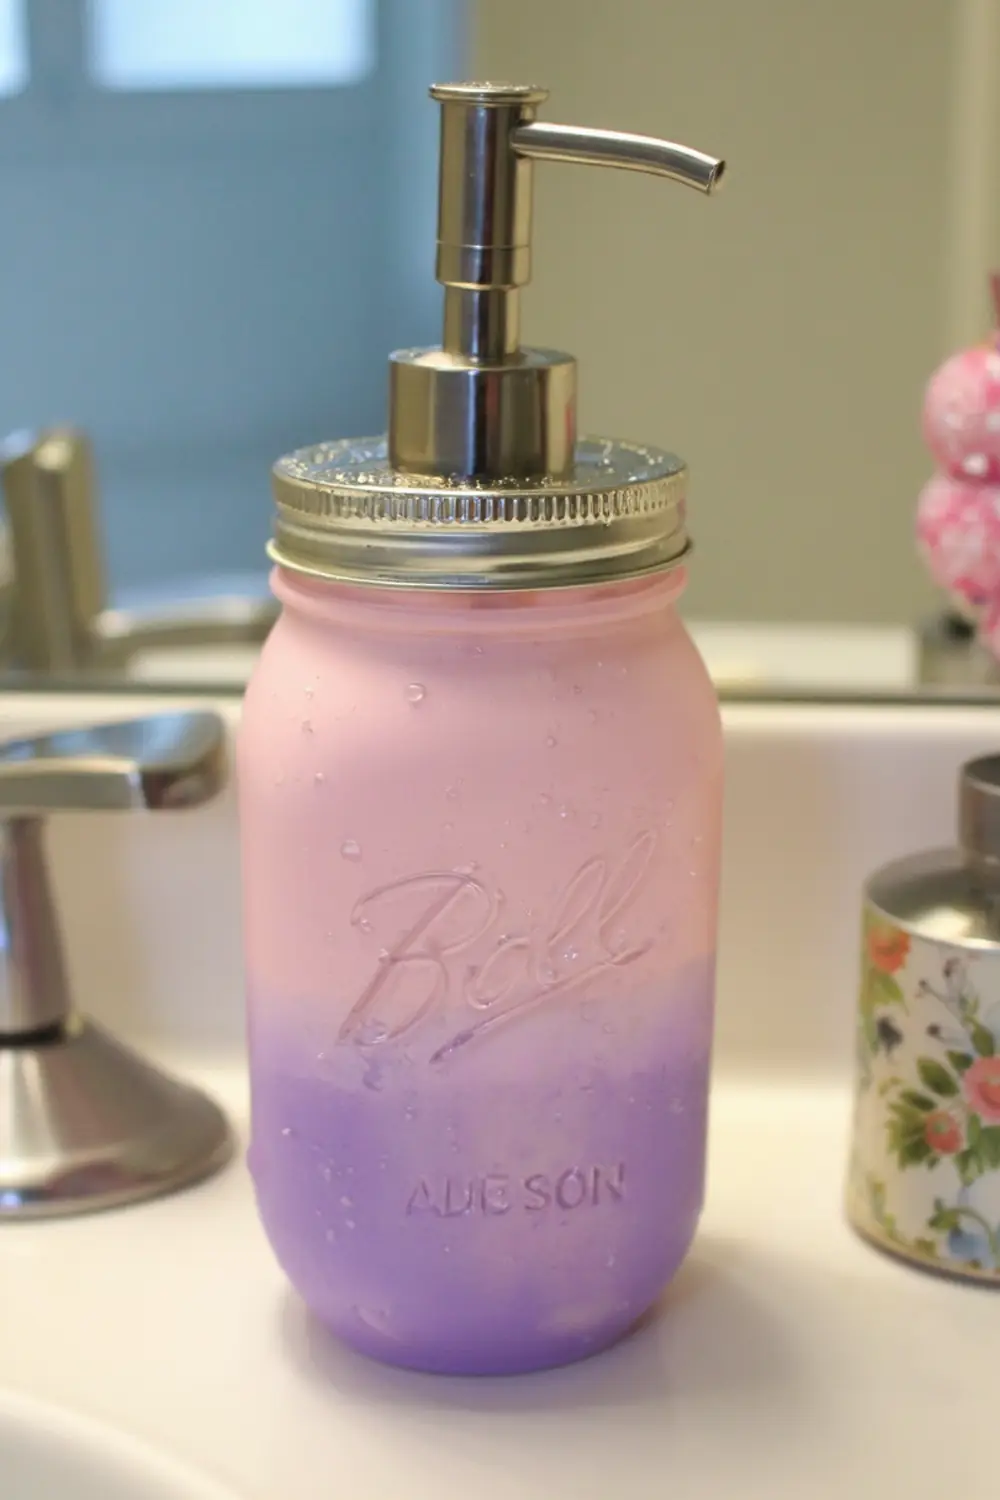
When your kids suddenly WANT to wash their hands, you know you’ve hit the craft jackpot!
You’ll need:
- Mason jar
- Soap pump lid (Amazon!)
- Acrylic paint
- Glitter paint
- Clear sealer
- Liquid soap
Paint the outside of your jar (we do ombre because it’s pretty forgiving if it’s not perfect). Add some glitter paint swirls or dots, then seal it all with clear coat. The pump tops screw right on to mason jars – who knew?!
My youngest calls hers the “princess soap castle” and honestly, whatever gets those hands clean!
14. Pressed Flower Votive Holders
My oldest and I made these last summer with flowers from our garden, and now I’m emotionally attached to them!
You’ll need:
- Small mason jars
- Pressed flowers
- Clear Mod Podge
- Small brush
- Battery tea lights
- Tweezers
Press your flowers first (we put ours in heavy books for a week). Then very carefully arrange them on the jar – tweezers help! Seal with Mod Podge and let each layer dry completely.
15. Musical Instrument Shakers
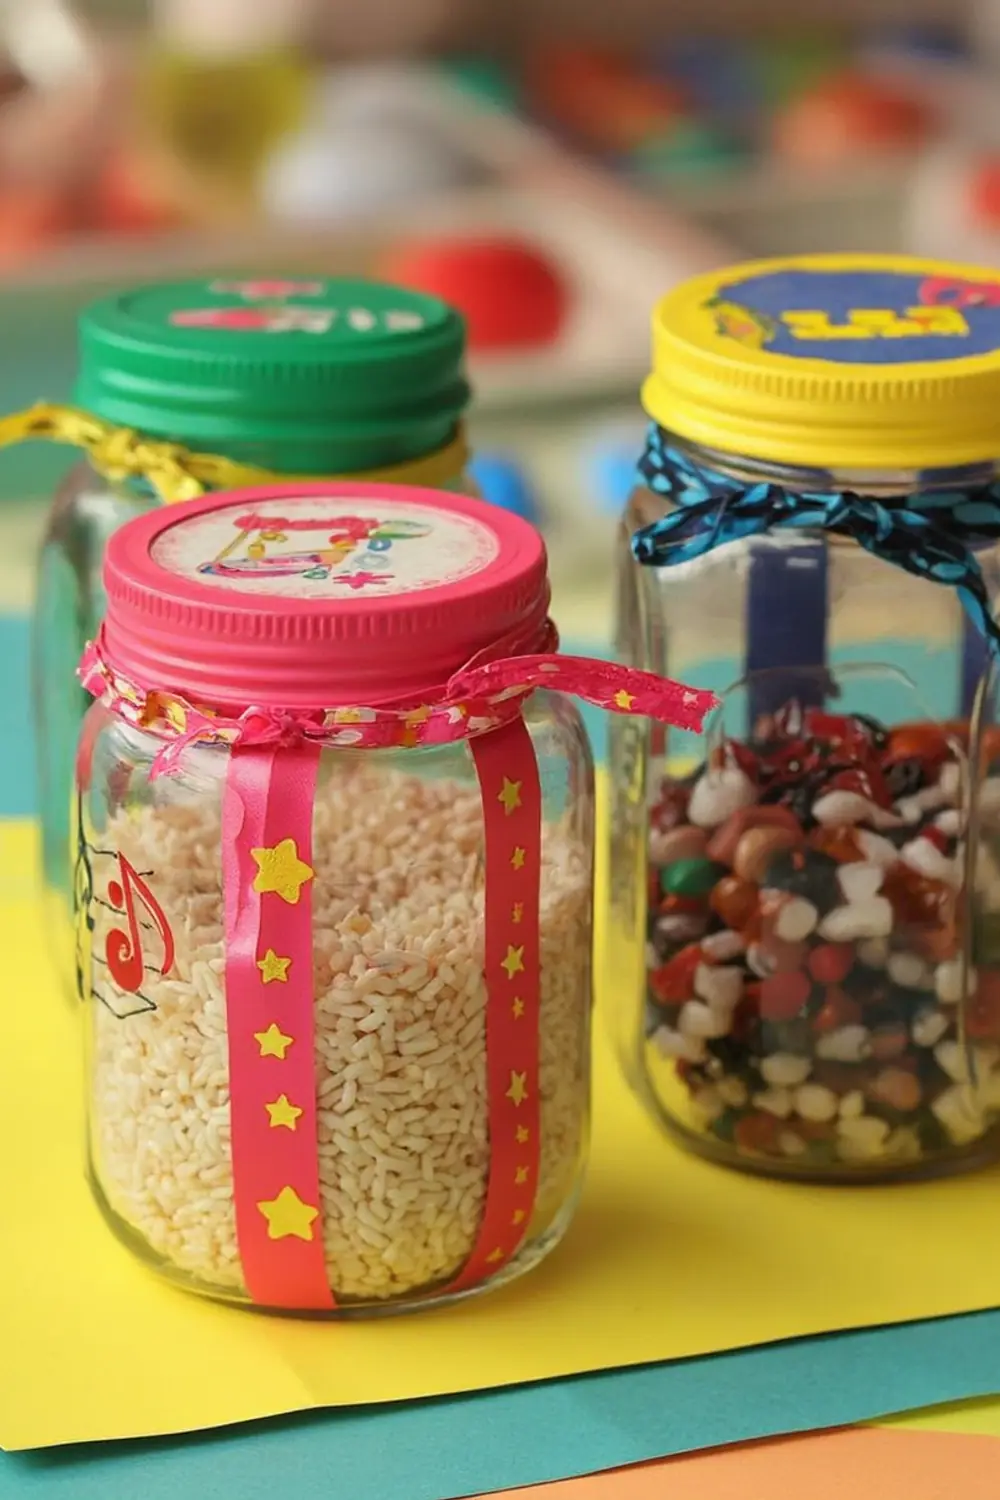
Warning: This craft is NOT for quiet days! But my girls have so much fun with their DIY band!
You’ll need:
- Small mason jars
- Various fillers (rice, beans, beads)
- Paint
- Strong glue
- Decorative tape
- Stickers
Fill each jar about 1/3 full with different materials for different sounds. We do rice for soft sounds, beans for medium, and beads for loud. Super glue those lids ON (learned that one the hard way… rice everywhere!).
The best part is decorating them – we go full rockstar with glitter and music notes!
16. Sweet Shop Storage Jars
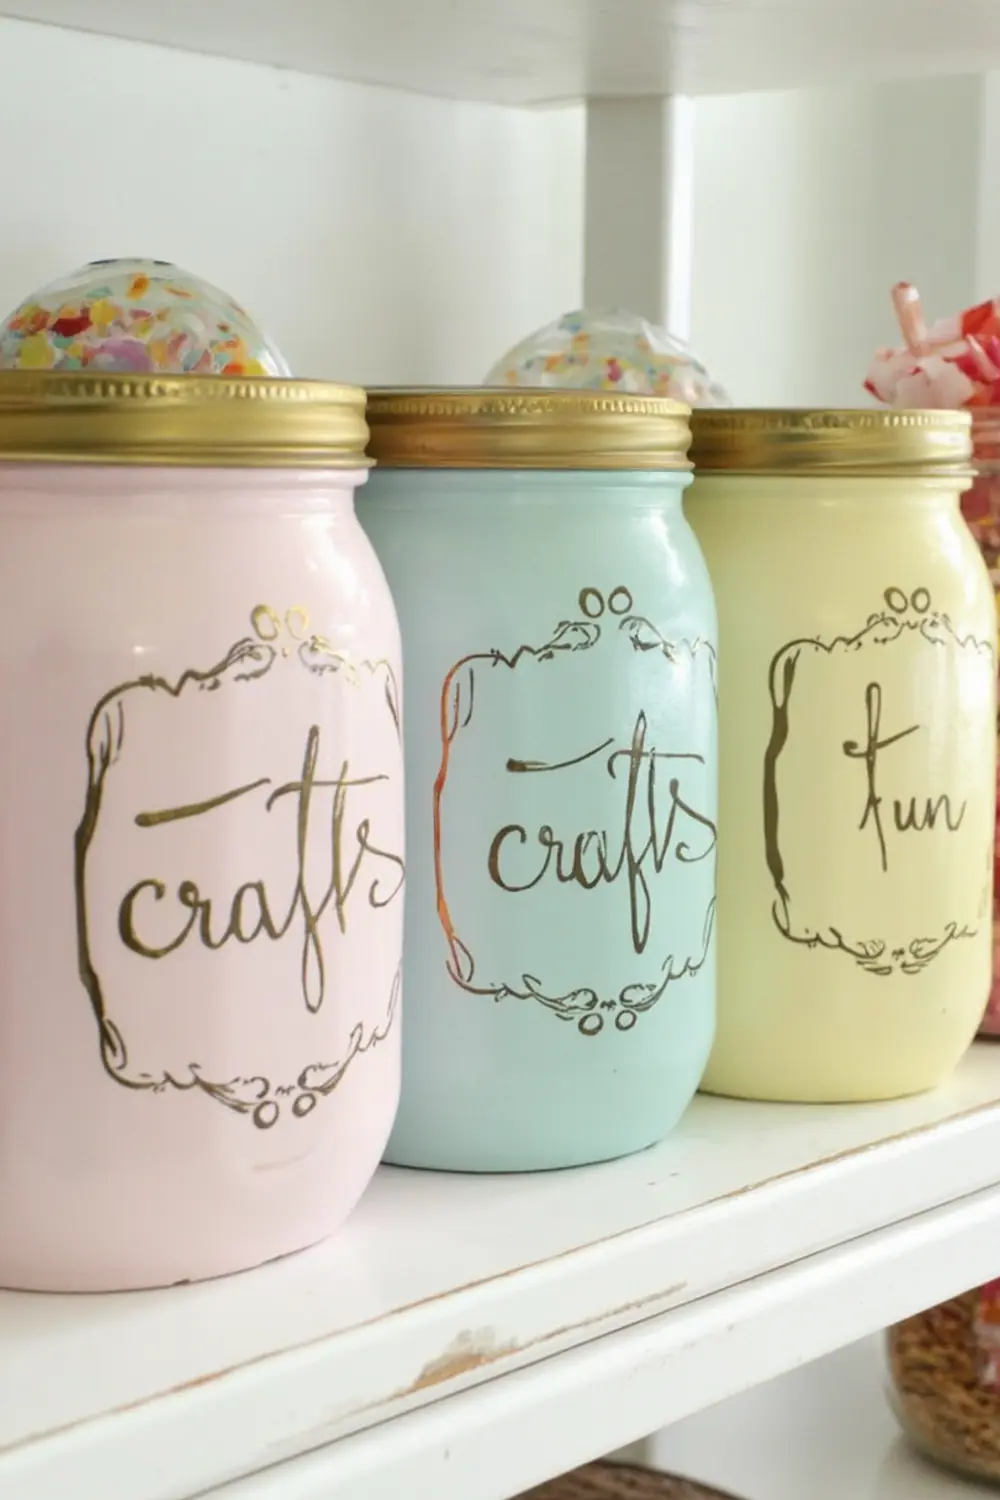
These are literally saving my sanity with all the tiny treasures my girls collect! Plus they look super cute in the playroom.
You’ll need:
- Mason jars (bigger = better!)
- Chalk paint
- Paint pens
- Stencils (optional)
- Clear sealer
- Pretty labels
Paint your jars with 2-3 coats of chalk paint (it sticks SO well to glass!). Once dry, add your decorative touches. I’m not great at hand lettering, so I totally use stencils – no shame in my mom game!
17. DIY Terrarium Jars
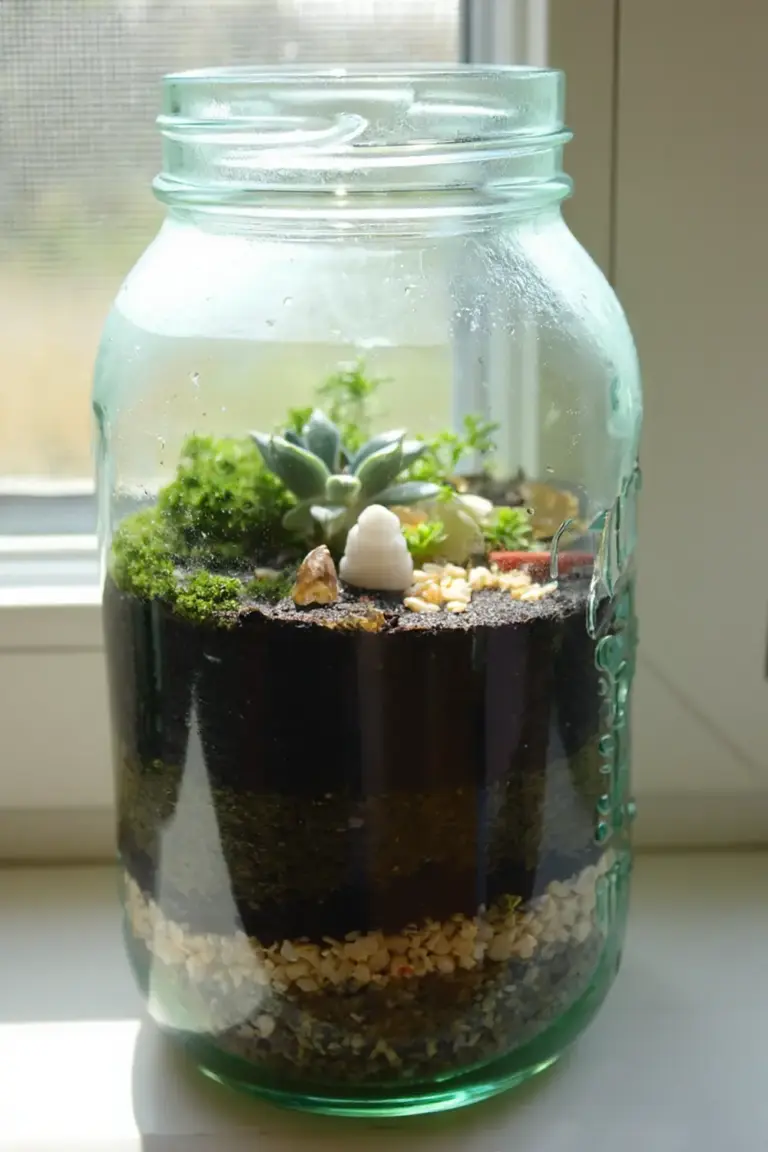
Okay, these are seriously addictive to make! My oldest got into these after seeing them on Pinterest, and now we have a whole windowsill of tiny gardens!
You’ll need:
- Large mason jar
- Small succulent plants
- Activated charcoal
- Small pebbles
- Potting soil
- Decorative moss
- Tiny garden decorations
Layer your materials: pebbles on bottom for drainage, then a thin layer of charcoal (keeps it fresh!), then soil. Add your plants and decorate with moss and tiny accessories. The hardest part is not overwatering – less is more!
18. Color-Mixing Discovery Jars
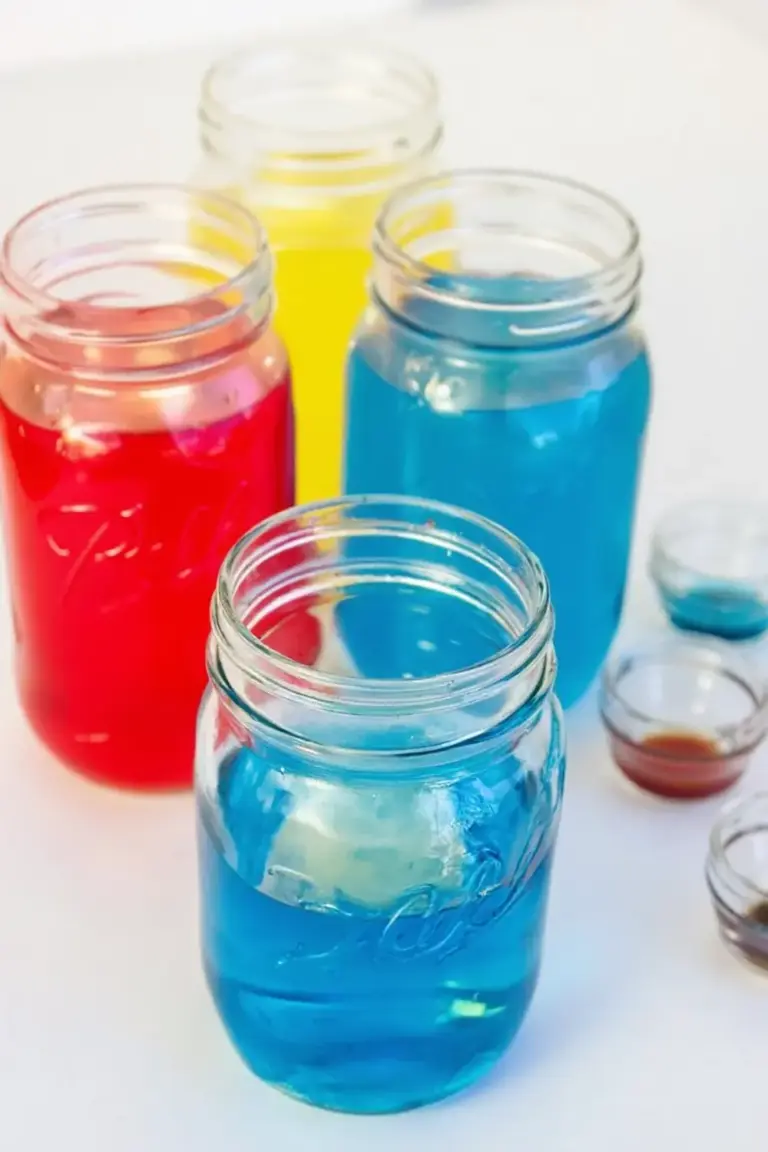
This craft is technically educational but don’t tell the kids! It’s perfect for rainy days when everyone’s getting stir-crazy.
You’ll need:
- Mason jars (several sizes)
- Food coloring
- Water
- Measuring cups
- White paper (for testing)
- Droppers
Fill your jars with water and add food coloring to make perfect primary colors. Then let your kids experiment with mixing different amounts in the smaller jars. My girls spent HOURS making “potions” and discovering how colors work!
Pro tip: Put down a plastic tablecloth first… trust me on this one!
19. Lunar Phase Light Jars
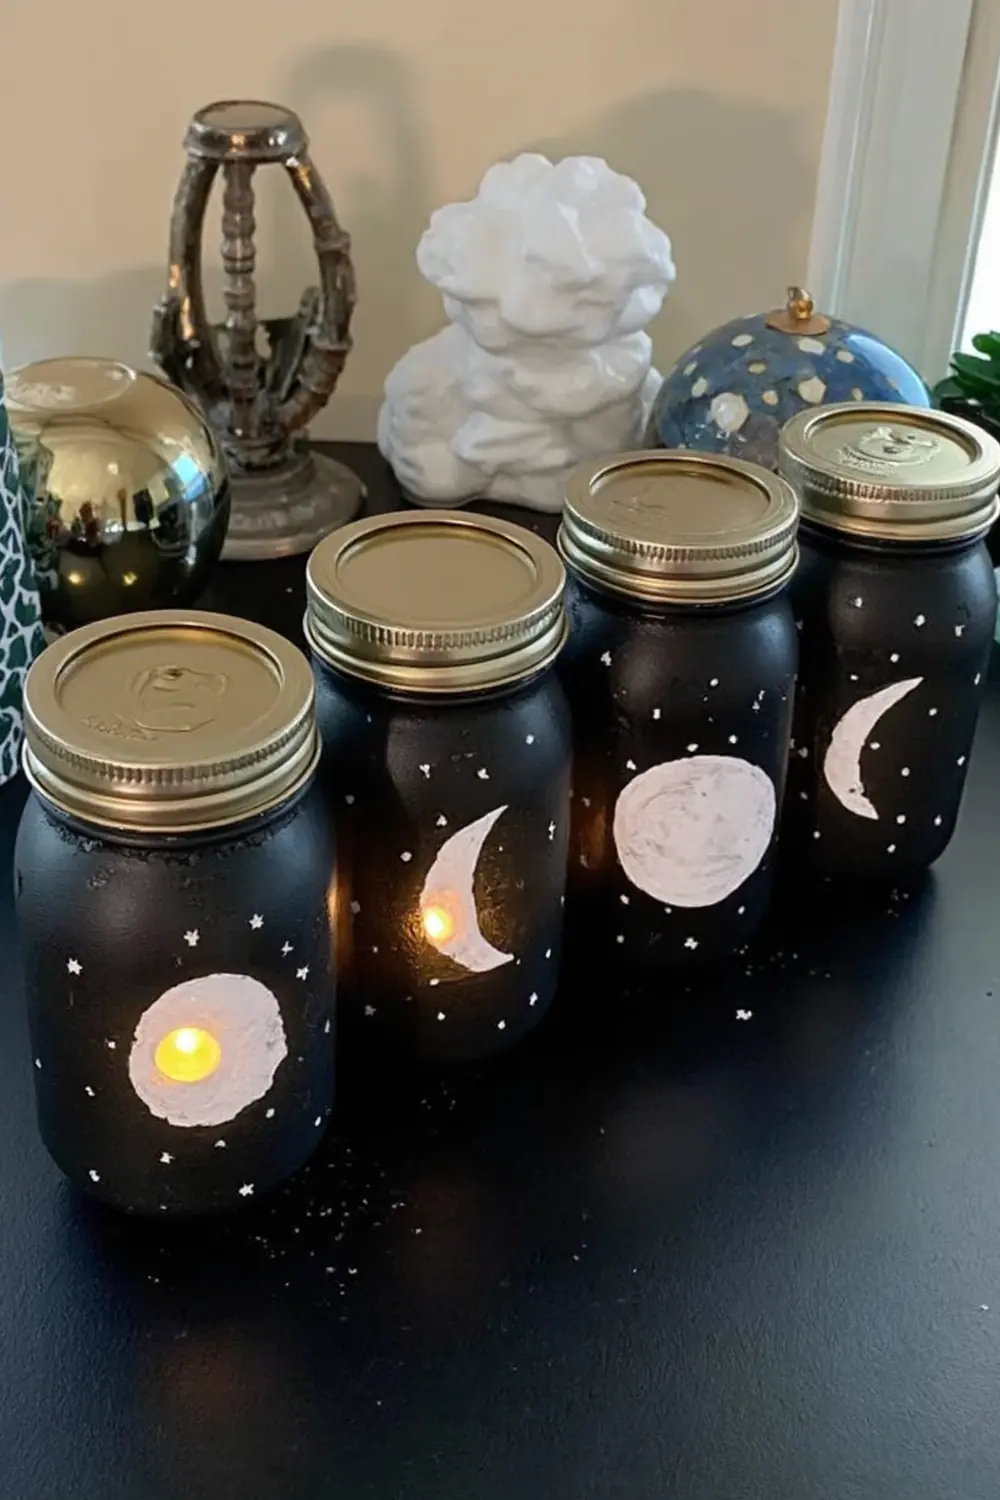
My space-obsessed kiddo literally squealed when we made these! Now they’re part of our bedtime routine.
You’ll need:
- Small mason jars
- Black paint
- White paint
- Round sponge
- Star stencils
- Battery tea lights
- Silver paint pen
Paint the jars black first (2 coats usually does it). Then use your round sponge to create the different moon phases in white. We looked up real moon photos for reference! Add little stars with the silver pen, pop in tea lights, and boom – instant astronomy lesson!
20. Seasonal Memory Jars
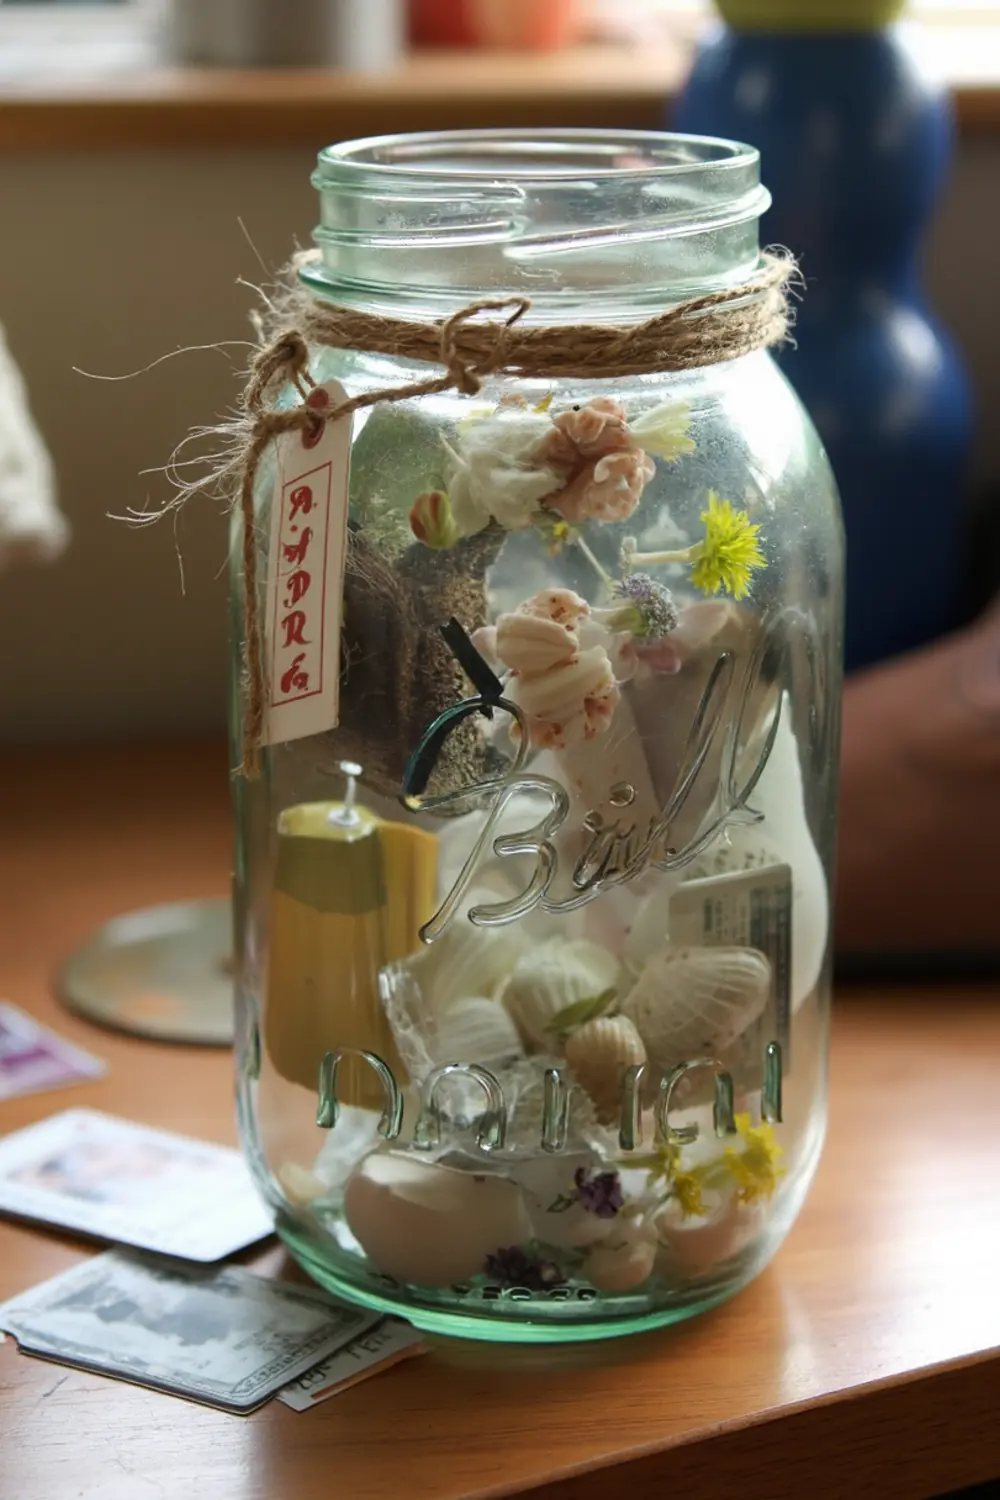
This is seriously my favorite way to save memories without ending up with 47 shoe boxes of “stuff” under the bed!
You’ll need:
- Large mason jar
- Archival paper tags
- Acid-free glue
- Small envelopes
- Decorative paper
- Permanent marker
- Seasonal treasures
We make one for each season – filling them with tiny treasures, photos, and notes about our adventures. My girls love looking back at their “summer jar” in the middle of winter!
21. DIY Wind Chimes
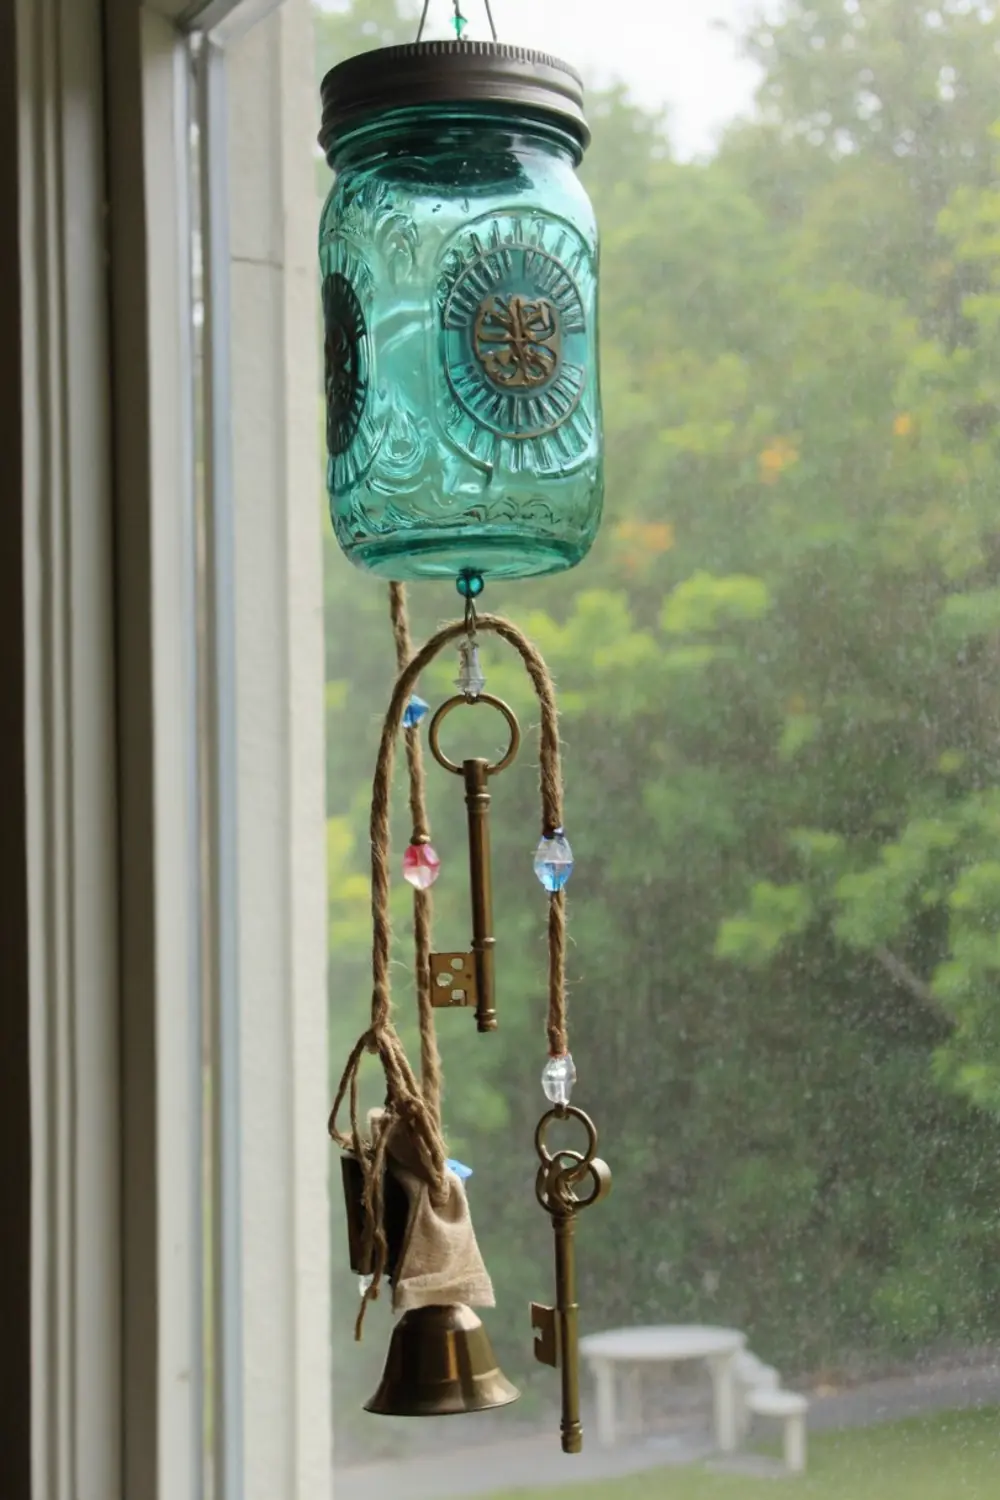
Fair warning: this one’s not for quiet backyards! But the sound is actually super pretty (like, not-annoying-after-an-hour pretty!).
You’ll need:
- Large mason jar rim
- Old keys or bells
- Fishing line or strong twine
- Beads and crystals
- Weather-resistant paint
- Clear outdoor sealer
Paint your jar rim and let it dry completely. Attach different lengths of twine and start adding your musical elements. The trick is varying the lengths and weights to get different sounds!
22. Rainbow Catcher Jars
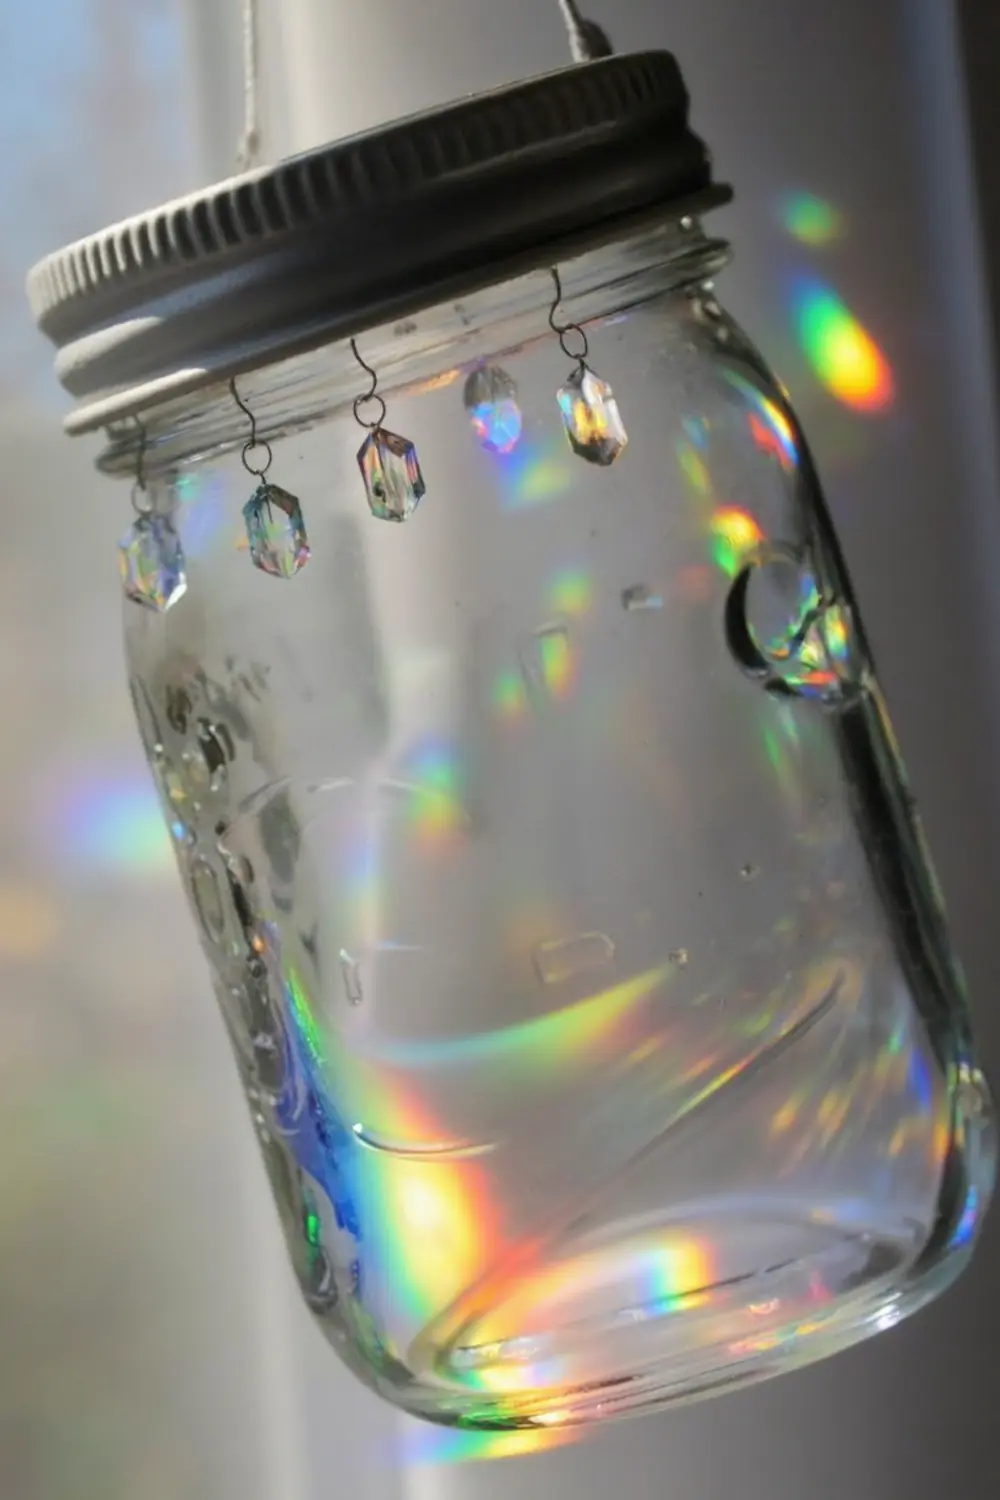
The first time we hung these up, my youngest was convinced actual fairies had moved in!
You’ll need:
- Mason jar rim
- Crystal beads
- Small prisms
- Fishing line
- White paint
- Strong adhesive
- Ribbon for hanging
Paint the rim white and let it dry. Then start hanging your crystals at different lengths inside the rim. The key is using different sizes of crystals to get lots of rainbow effects!
Pro tip: Hang these where they’ll catch morning sun – best way to wake up ever!
23. Mini Mason Jar Snow Scene Dioramas

You guys, this craft totally brings out everyone’s inner artist! Even my husband got super into making his own (though his ended up looking more like a tiny zombie apocalypse scene).
You’ll need:
- Wide-mouth mason jar
- Miniature trees and figures
- Air-dry clay (for the base)
- Fake snow
- Small LED string lights
- Paint for background
- Strong craft glue
- Tiny decorative elements
First, lie your jar on its side and use the lid as your “stage.” Create your base with the clay and let it dry completely. Paint your background on the inside curve of the jar (we do a simple winter sky with some white clouds).
The magic happens when you start arranging your scene! Use the clay to secure your items – trees, houses, little animals. Add a sprinkle of fake snow and carefully weave in the tiny lights.
Pro tip: Plan your scene BEFORE gluing! My youngest got a bit excited and ended up with all her trees facing the wrong way (though she insists it’s a “magical backwards forest” so… whatever works!)
Yay!
And there you have it, 24 23 fun, fabulous, and totally doable mason jar crafts to brighten up your day (and your home). But wait, didn’t I promise 24?
Yuppers, I did! And I had the most perfect, glittery craft ready to go… until the accident happened.
Picture this: I had the kids gathered around, glue guns in hand, ready to create a mason jar lantern masterpiece.
Then, in a dramatic turn of events, my youngest knocked over the jar…and of course…the glass shattered into a million tiny pieces.
Cue the crying, the vacuuming, and the realization that I was maybe not cut out to be Martha Stewart after all. 😅
After the glass mishap, the tantrums, and the bad vibes (seriously, I think that jar brought some bad karma into our house), I decided that one craft was best left unmade.
So, in the spirit of saving my sanity and your peace of mind, we’re stopping at 23.
But hey, sometimes life is just like that…imperfect, unpredictable, and a little messy.
And honestly, that’s part of the fun, right?
So grab your jars, embrace the chaos, and let’s make some memories.
If one of your crafts goes a little sideways (literally, like mine did), just remember: it’s the love, laughter, and creativity that matter most.
Here’s to 24 23 amazing crafts and to making the best out of every single moment—no matter how messy it gets! 💖